Usage Instructions Available

Scroll down or click below to view detailed instructions for TRT Rapid Pen

TRT Rapid Pen

TRT Rapid Pen

600mg testosterone per 3ml cartridge

Contains:

Testosterone Cypionate

Testosterone Enanthate


Fractionated coconut oil (Palm Free)

Benzyl Benzoate, Benzyl Alcohol

The Elite Rapid Pen is a state-of-the-art subcutaneous testosterone delivery system designed for ease of use and consistent dosing ensuring precise administration of testosterone with minimal discomfort in as little as 60 seconds. 

Advanced injection pen technology administers accurate dosages from as low as 2mg with a even 50/50 split of testosterone cypionate and enanthate giving a perfect balance closest to the body's natural hormone production.

Key Features:

  • Easy-to-use pre-filled delivery system
  • Precise dosage control 2mg per click
  • None to minimal injection site irritation
  • Convenient for home, travel or clinical use
  • Sterile and safety-tested
  • Discreet and durable metal container 

NOTES:

We recommend ordering universal fit insulin pen needles size 29g (0.33mm) and minimum length 10mm

Inside each box:
1 x Multi use pen with cartridge
2 x additional cartridge
4 x disposable needle

ANABOLIC ACTIVITY INDEX

100

ANDROGENIC ACTIVITY INDEX

100

AT A GLANCE

half life icon

ACTIVE HALF-LIFE

4-9 Days
classification icon

CLASSIFICATION

Androgenic Steroid Sex Hormone
dosage icon

DOSAGE

Men 20-30mg Daily
acne icon

ACNE

No
water retention icon

WATER RETENTION

Minimal
hbr icon

HBR

No
hepatoxity icon

HEPATOXITY

No
aromatization icon

AROMATIZATION

Dosage dependent
Usage Instructions

How to Use TRT Rapid Pen

Follow these simple steps to properly use your TRT Rapid Pen for optimal results

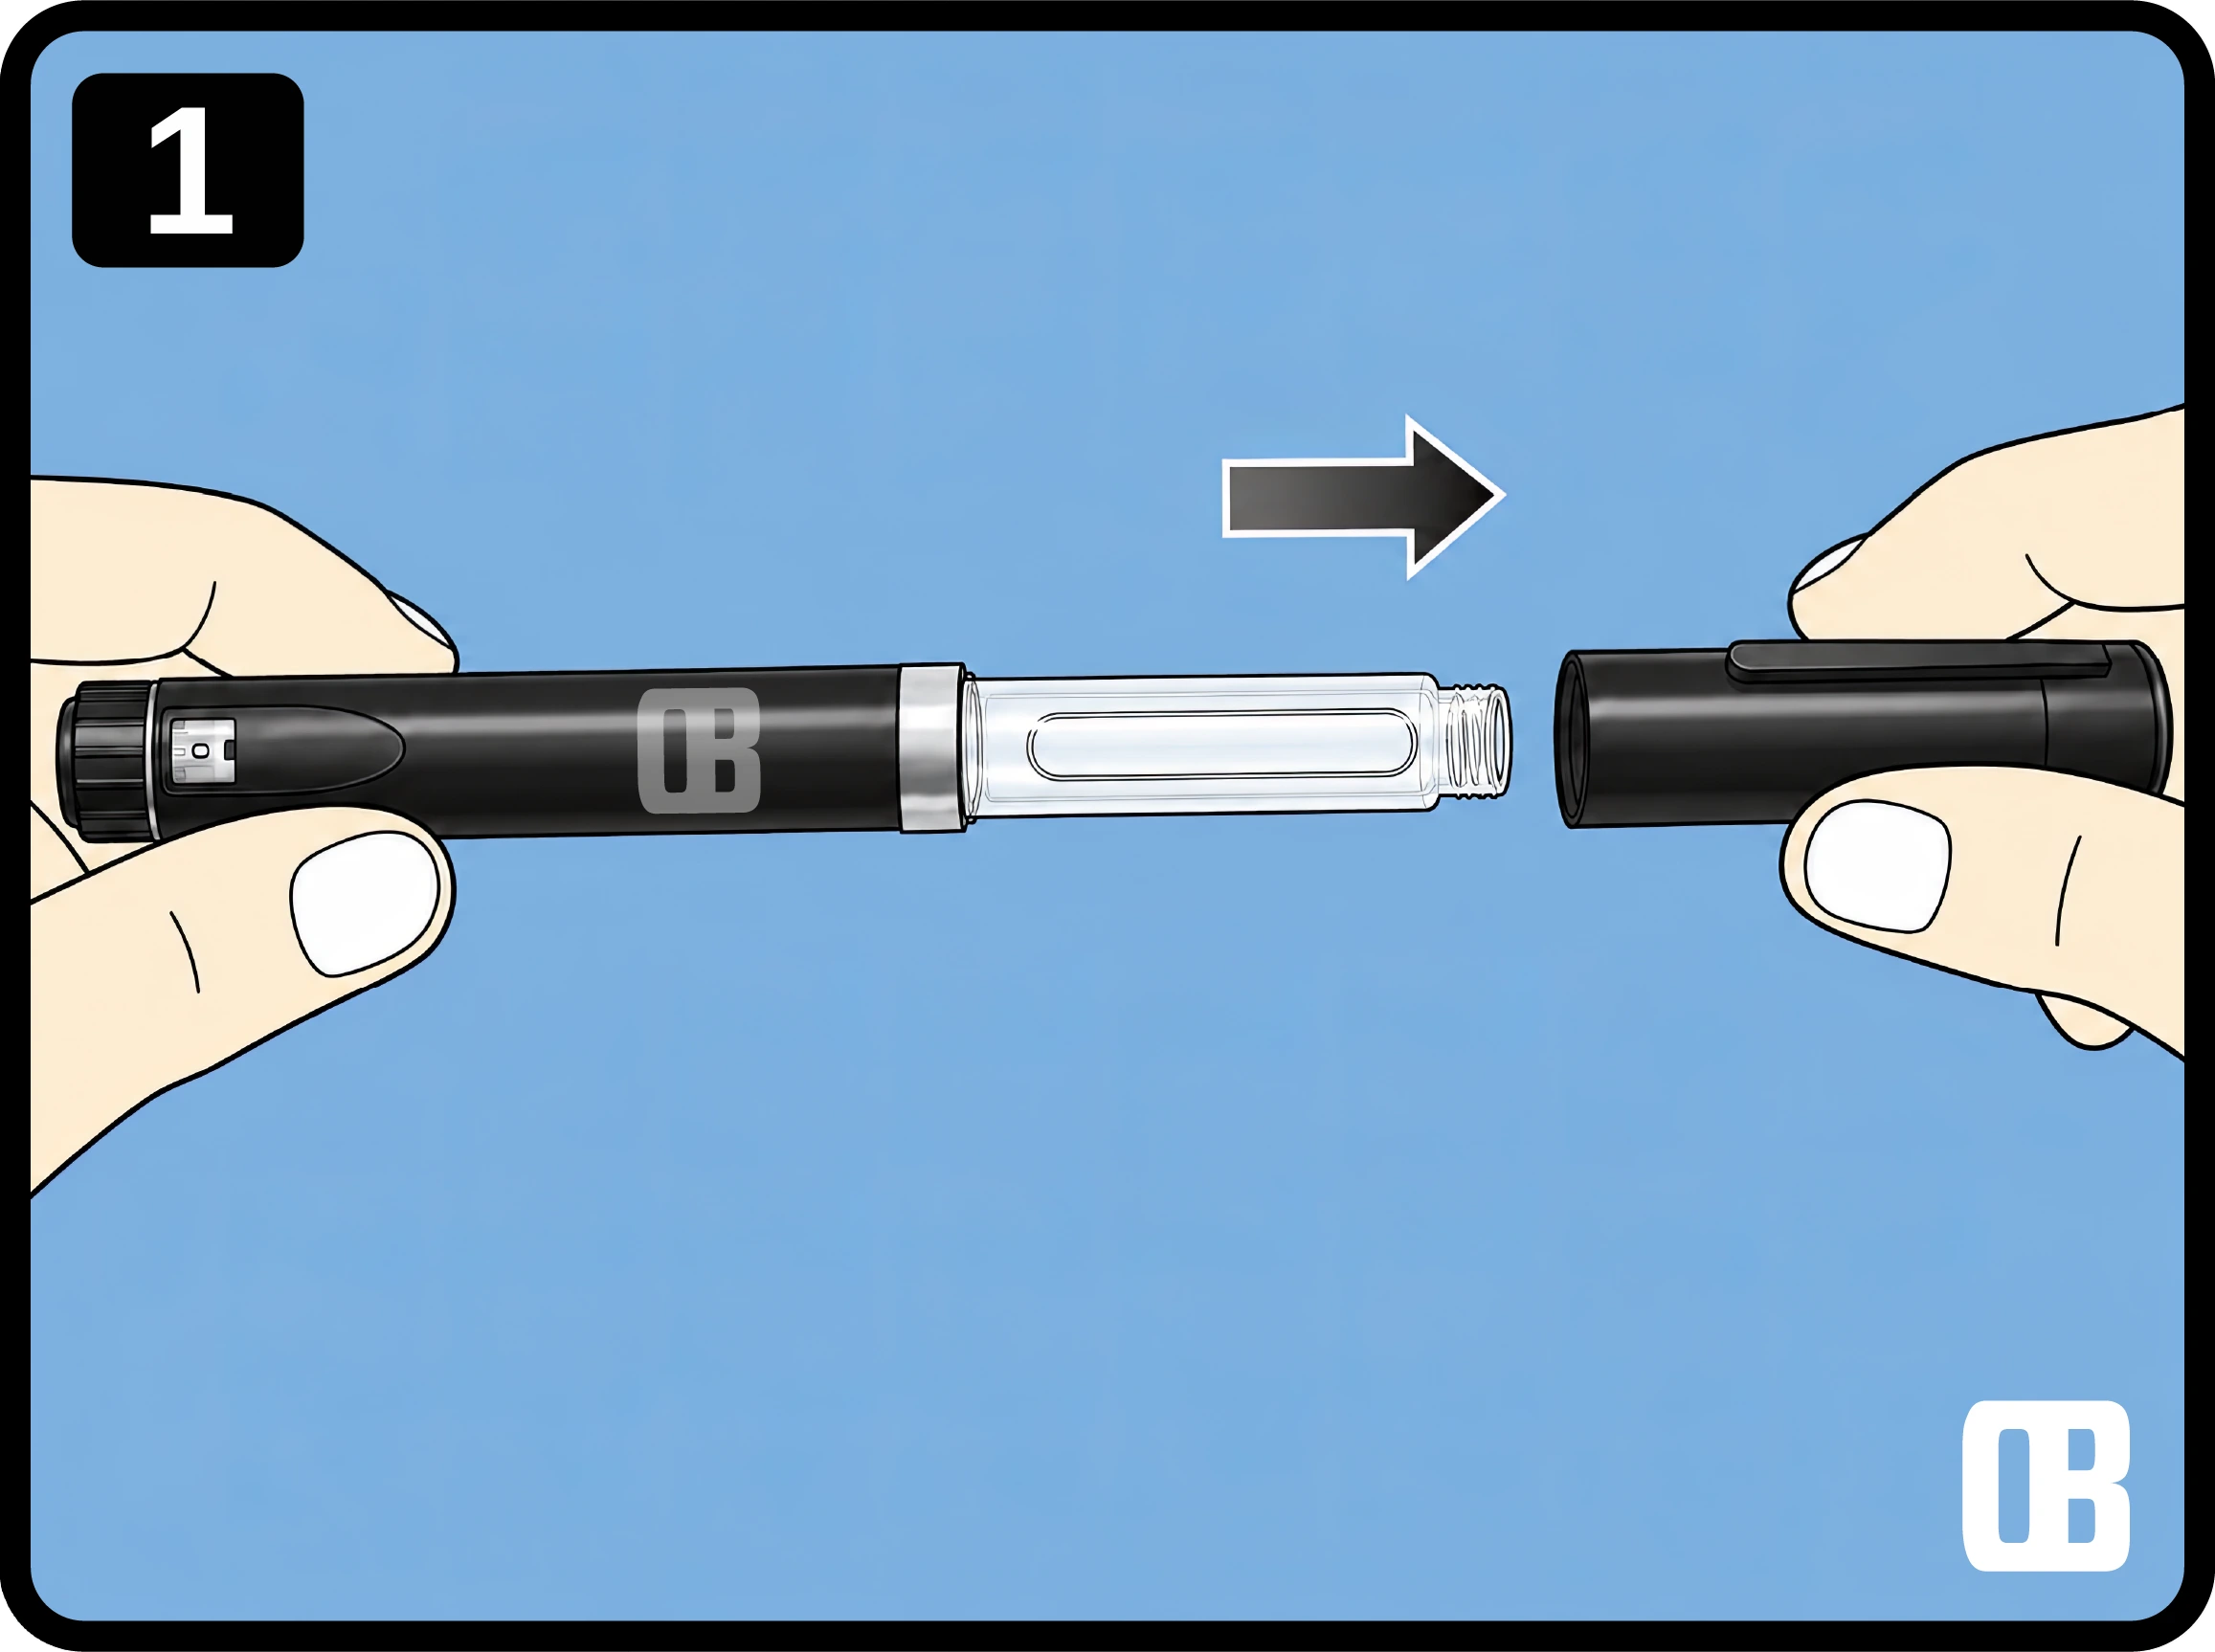
1

Separate the Pen Parts

Preparations for inserting a new cartridge.

  • Hold the pen body as shown.
  • Keep the cartridge aligned with the pen body.
  • Prepare a clean workspace before assembly.

Important Note

Handle all components carefully to maintain sterility and avoid damage.

Separate the Pen Parts
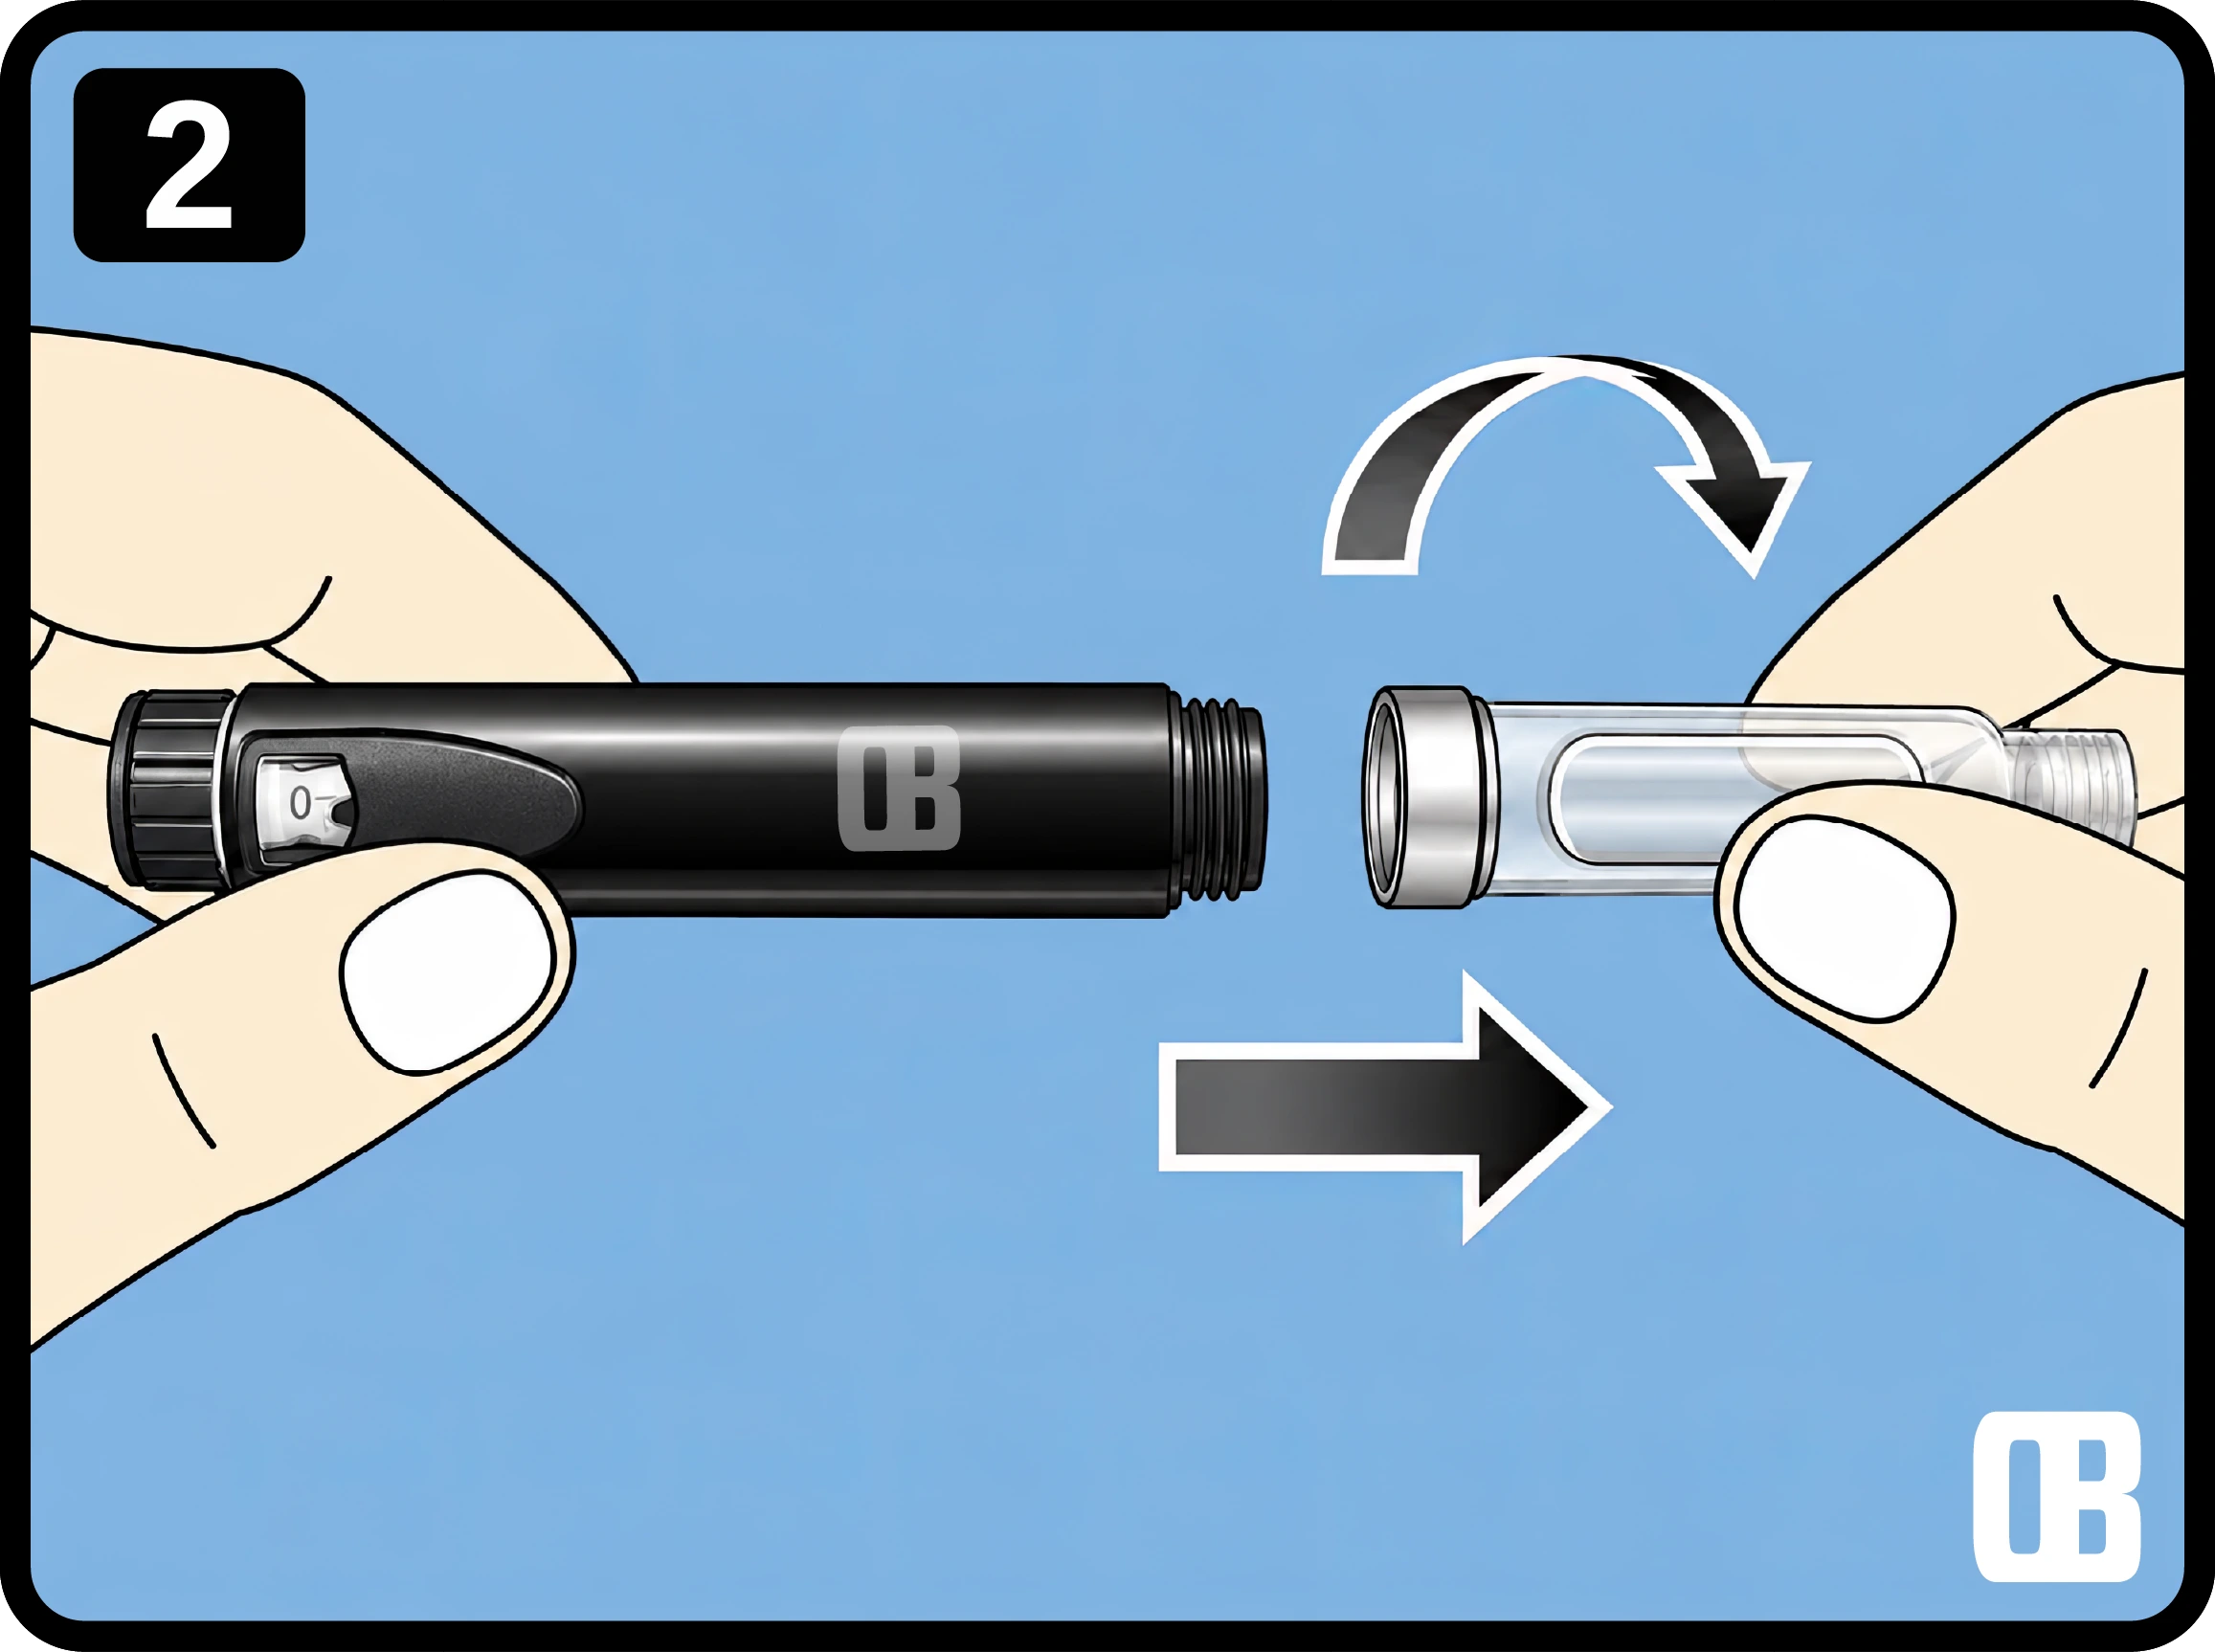
2

Open the pen

Turn counter clockwise and remove empty cartridge.

  • Match the new cartridge opening to the connector end.
  • Insert the cartridge straight without forcing it.
  • Confirm the fit is even and secure before proceeding.

Important Note

Push the plunger back to its original position before inserting a new cartridge.

Open the pen
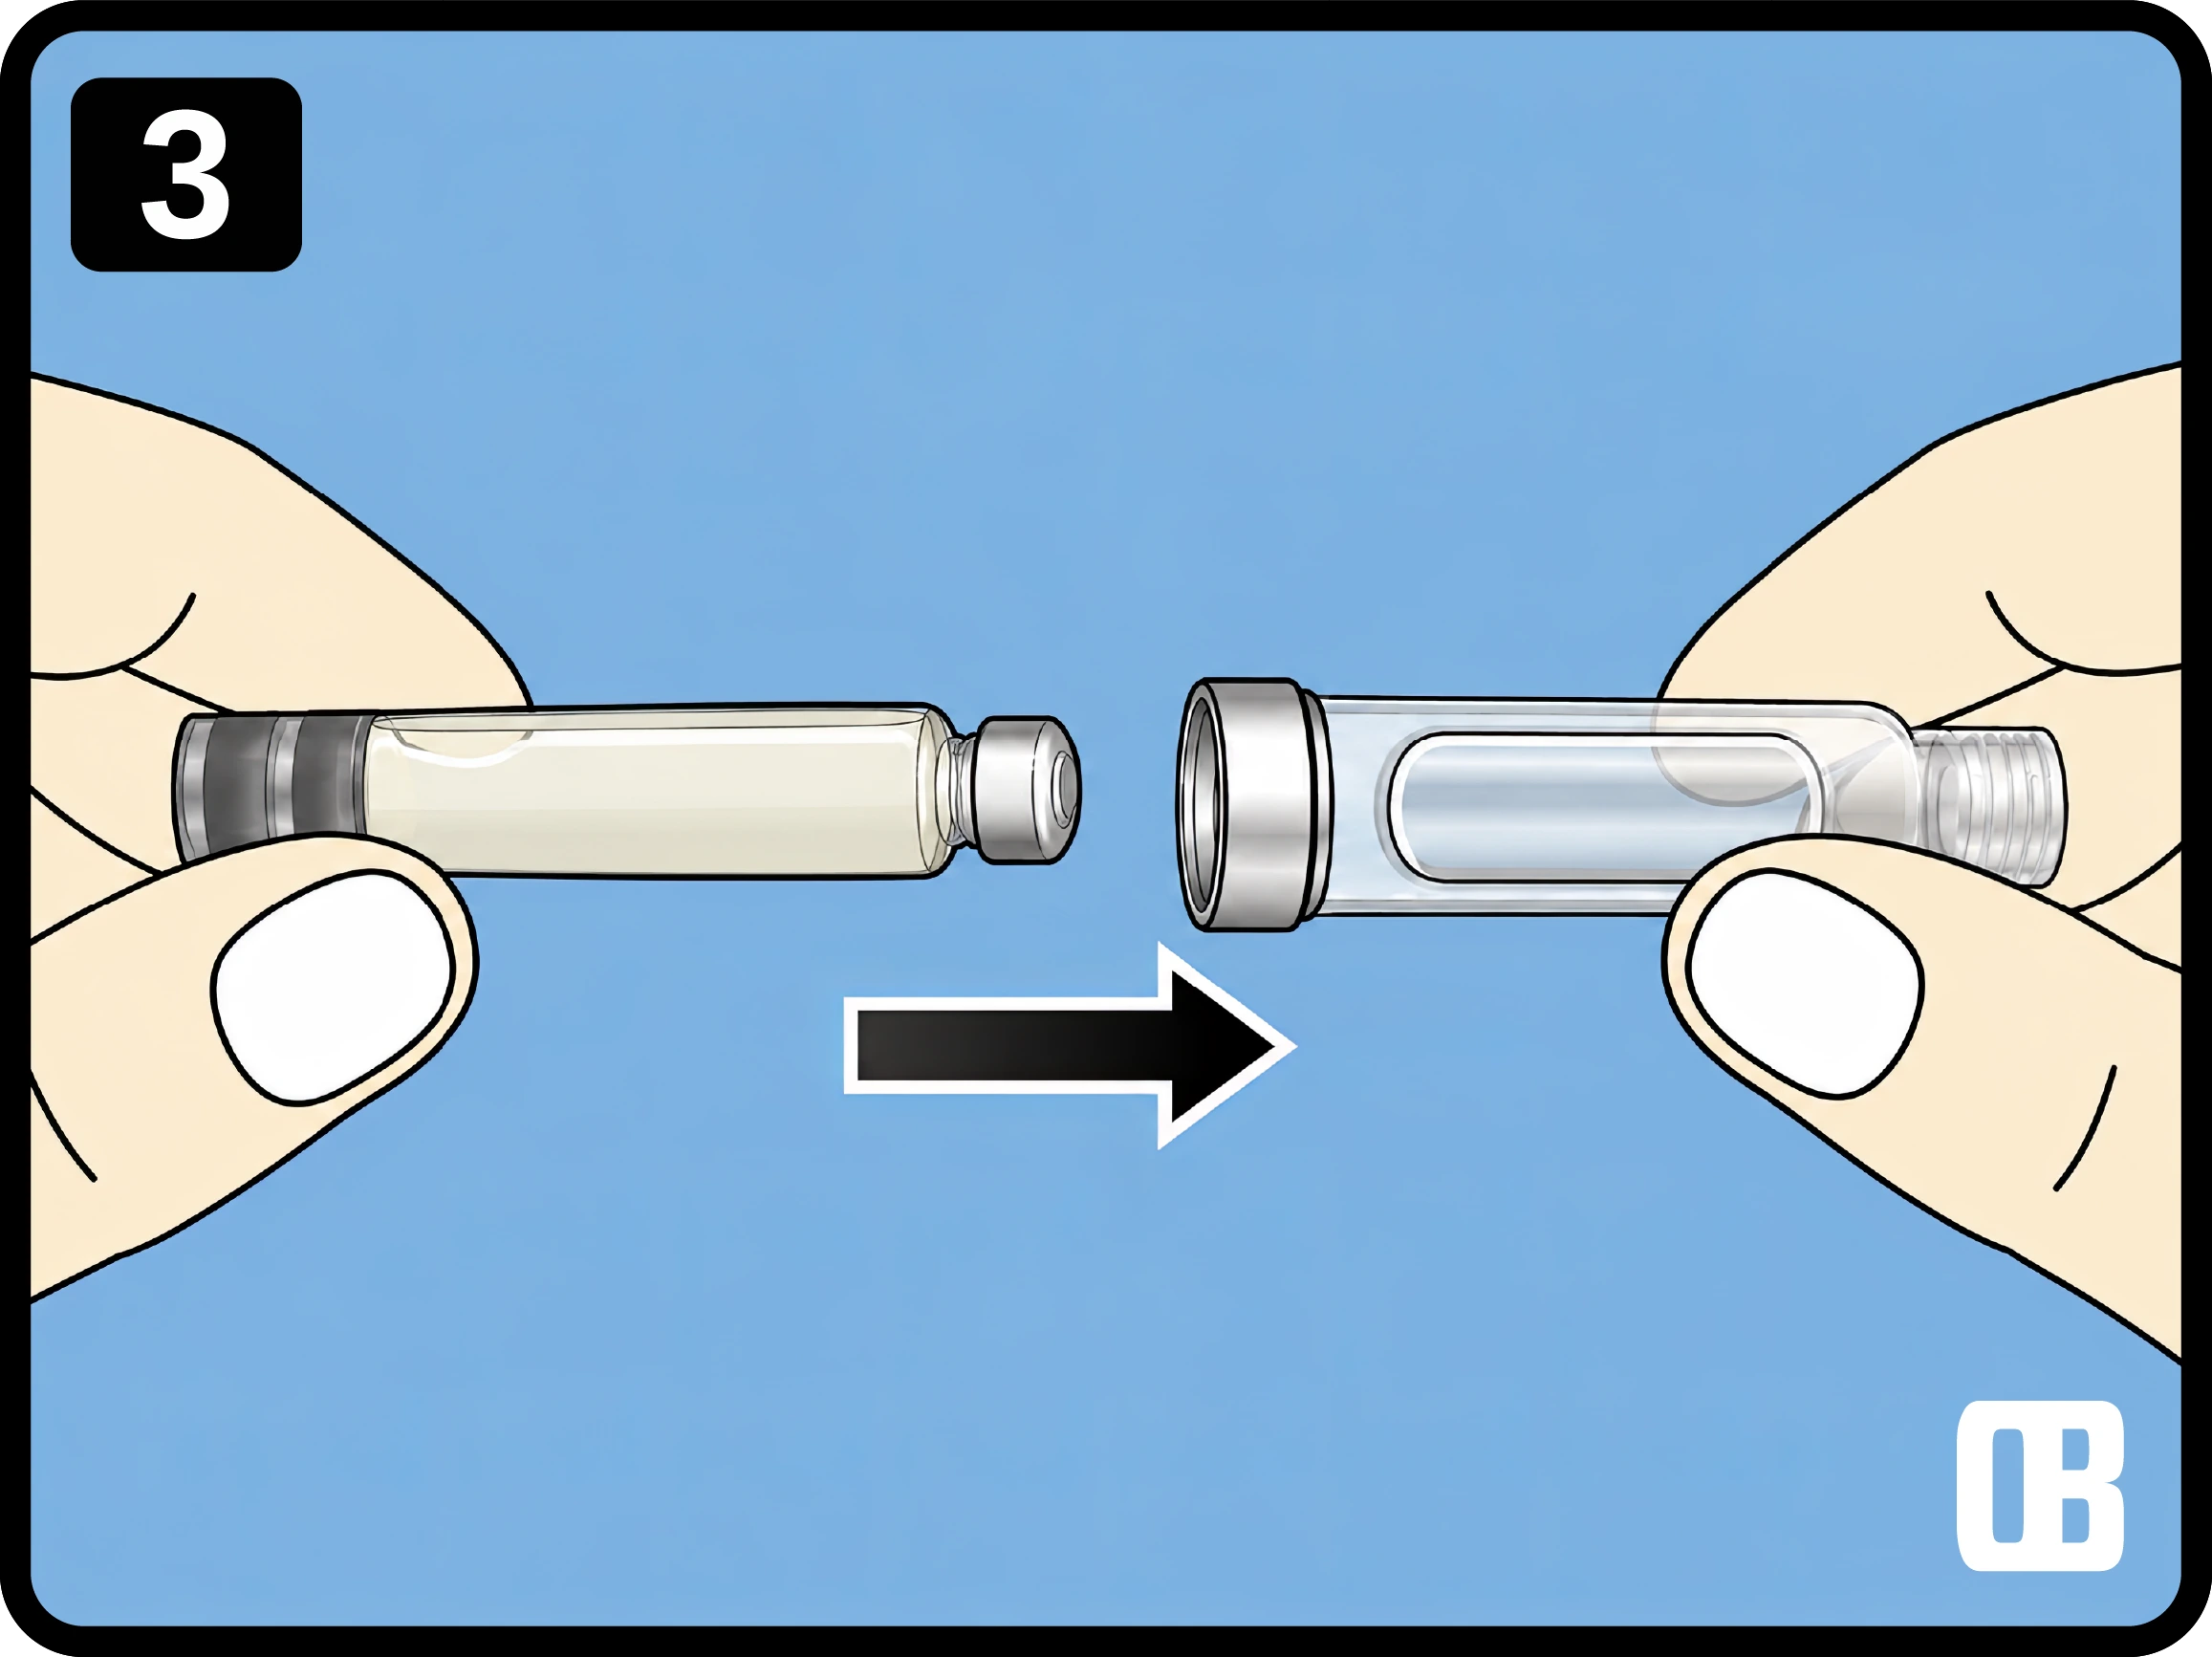
3

Load the Cartridge

Insert the filled cartridge into the pen housing.

  • Position the cartridge with the correct orientation.
  • Slide it into the housing until seated correctly.
  • Check that the cartridge moves smoothly into place.

Important Note

Do not use excessive force during insertion.

Load the Cartridge
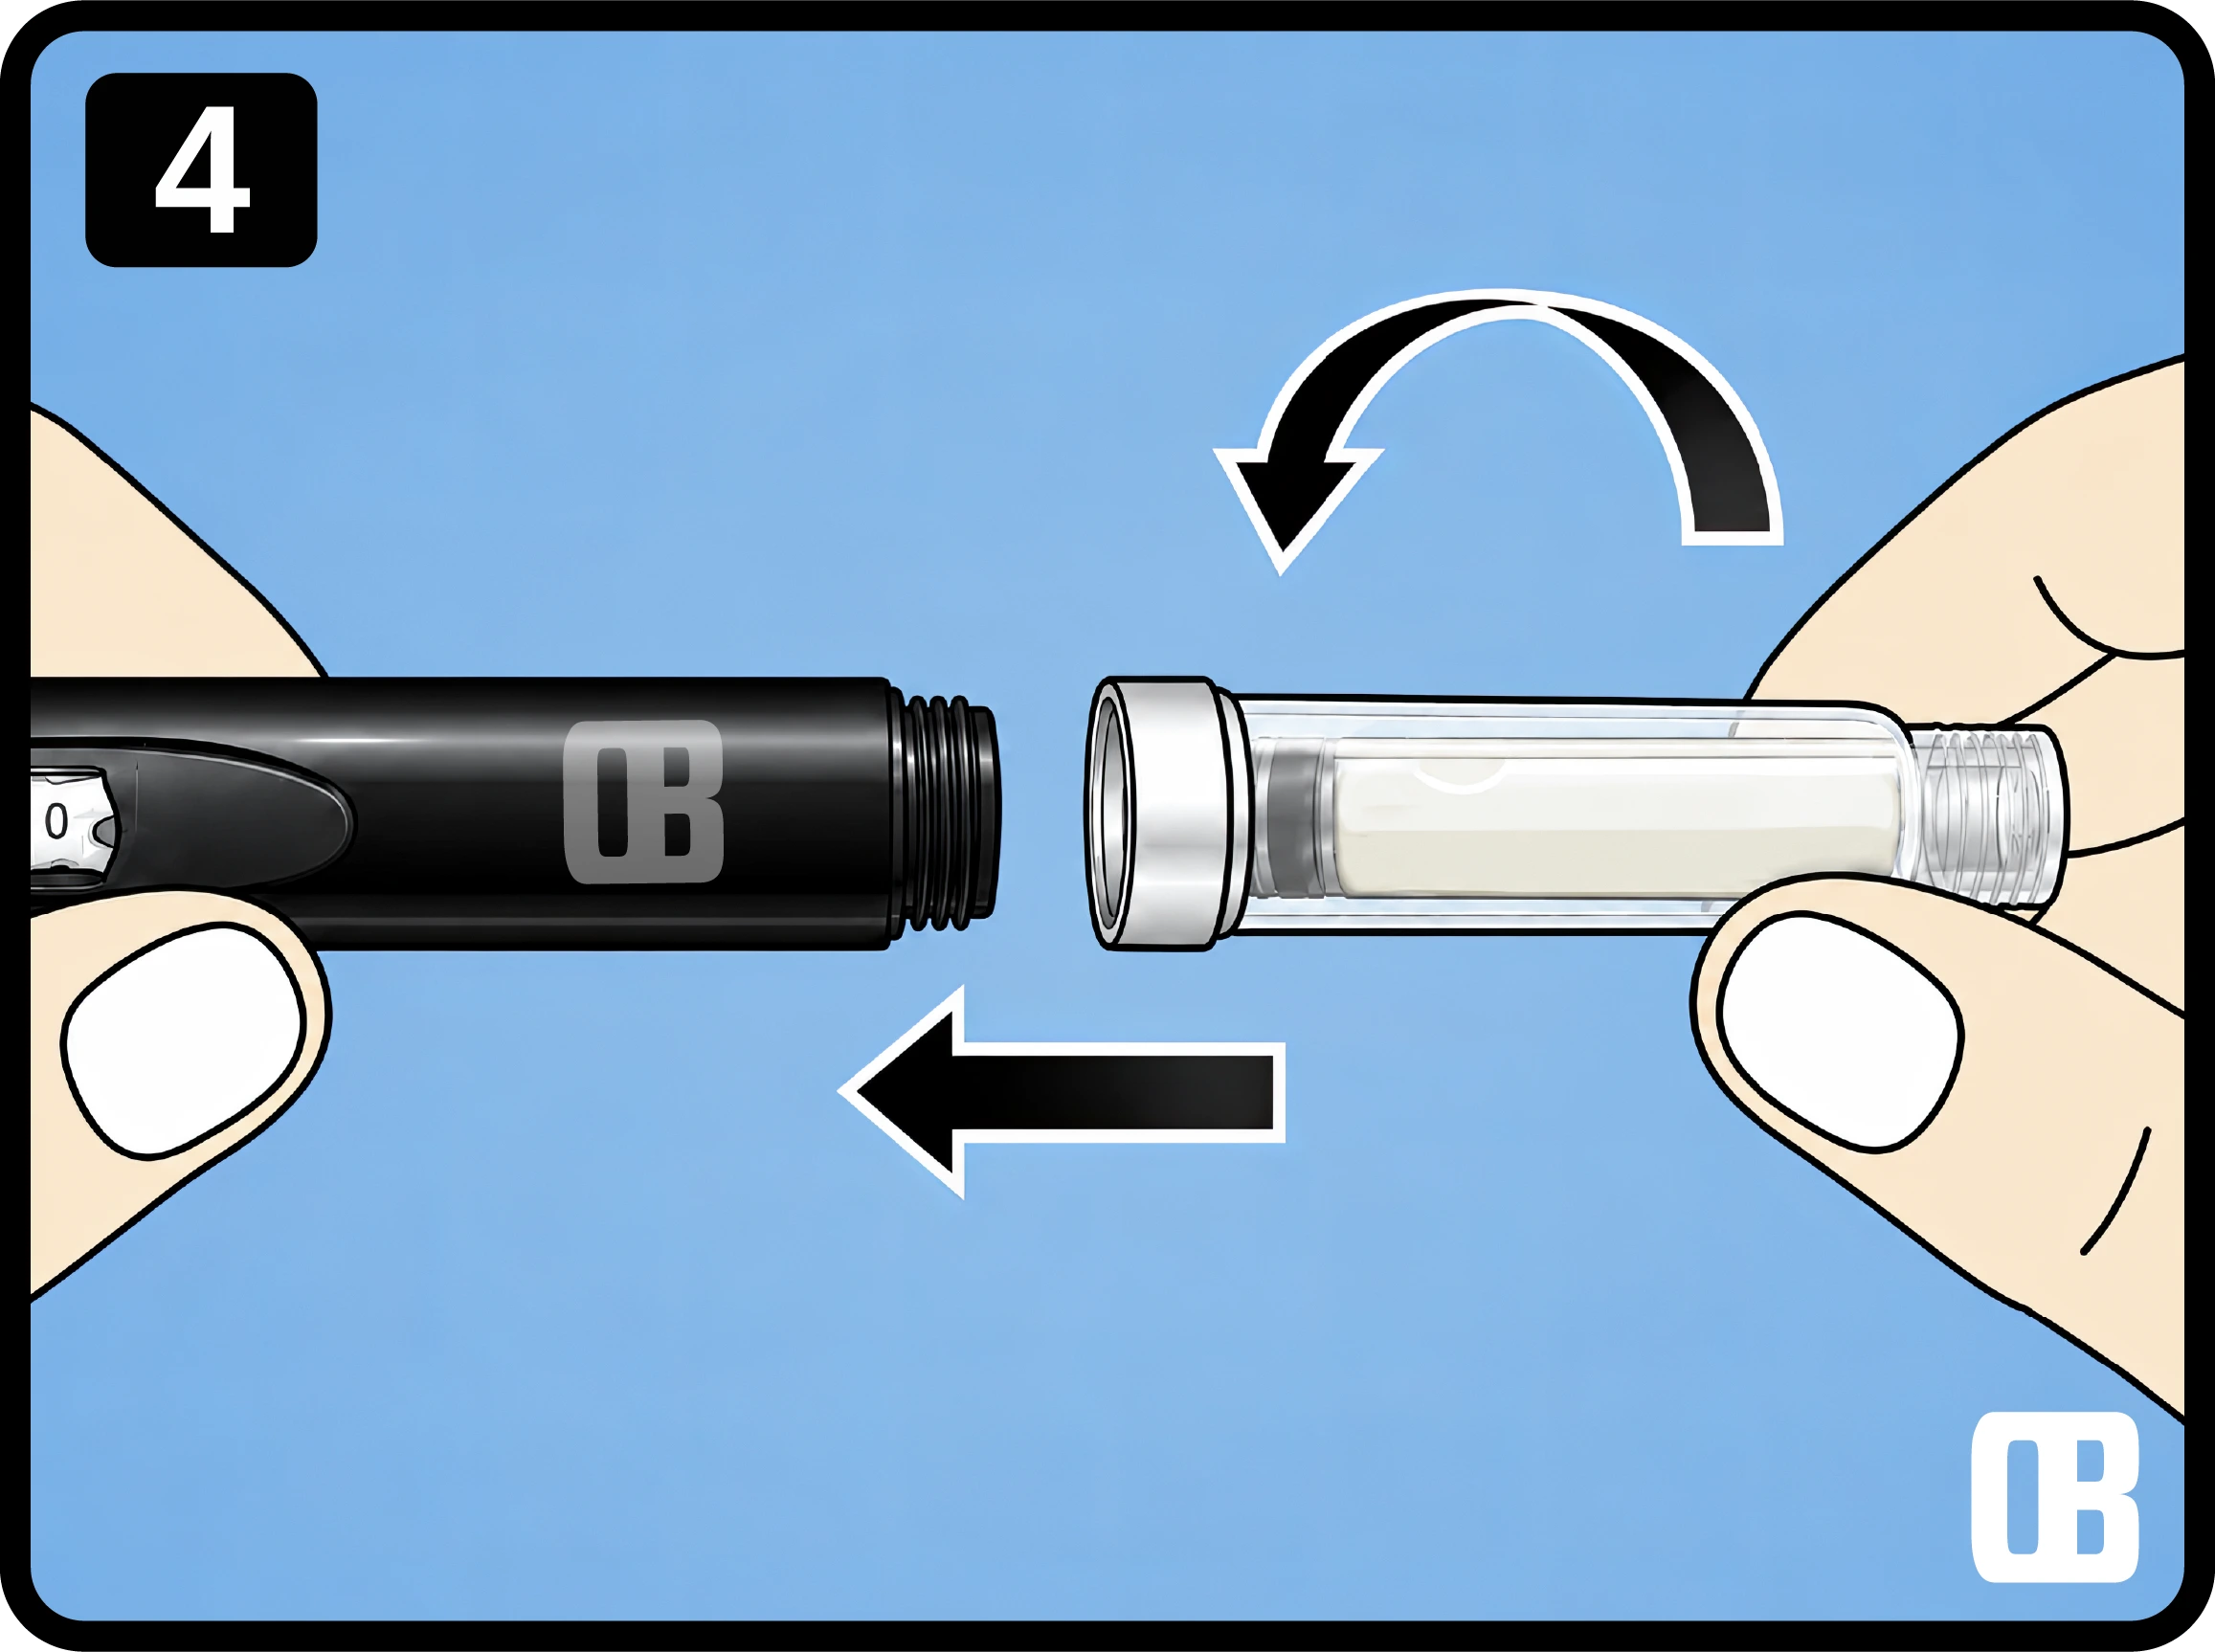
4

Join the Components

Bring the cartridge and pen body together until they are properly fitted.

  • Align both sections on the same axis.
  • Press and turn clockwise until the components meet cleanly.
  • Inspect the junction to confirm proper assembly.

Important Note

An incomplete join may affect operation and dose delivery.

Join the Components
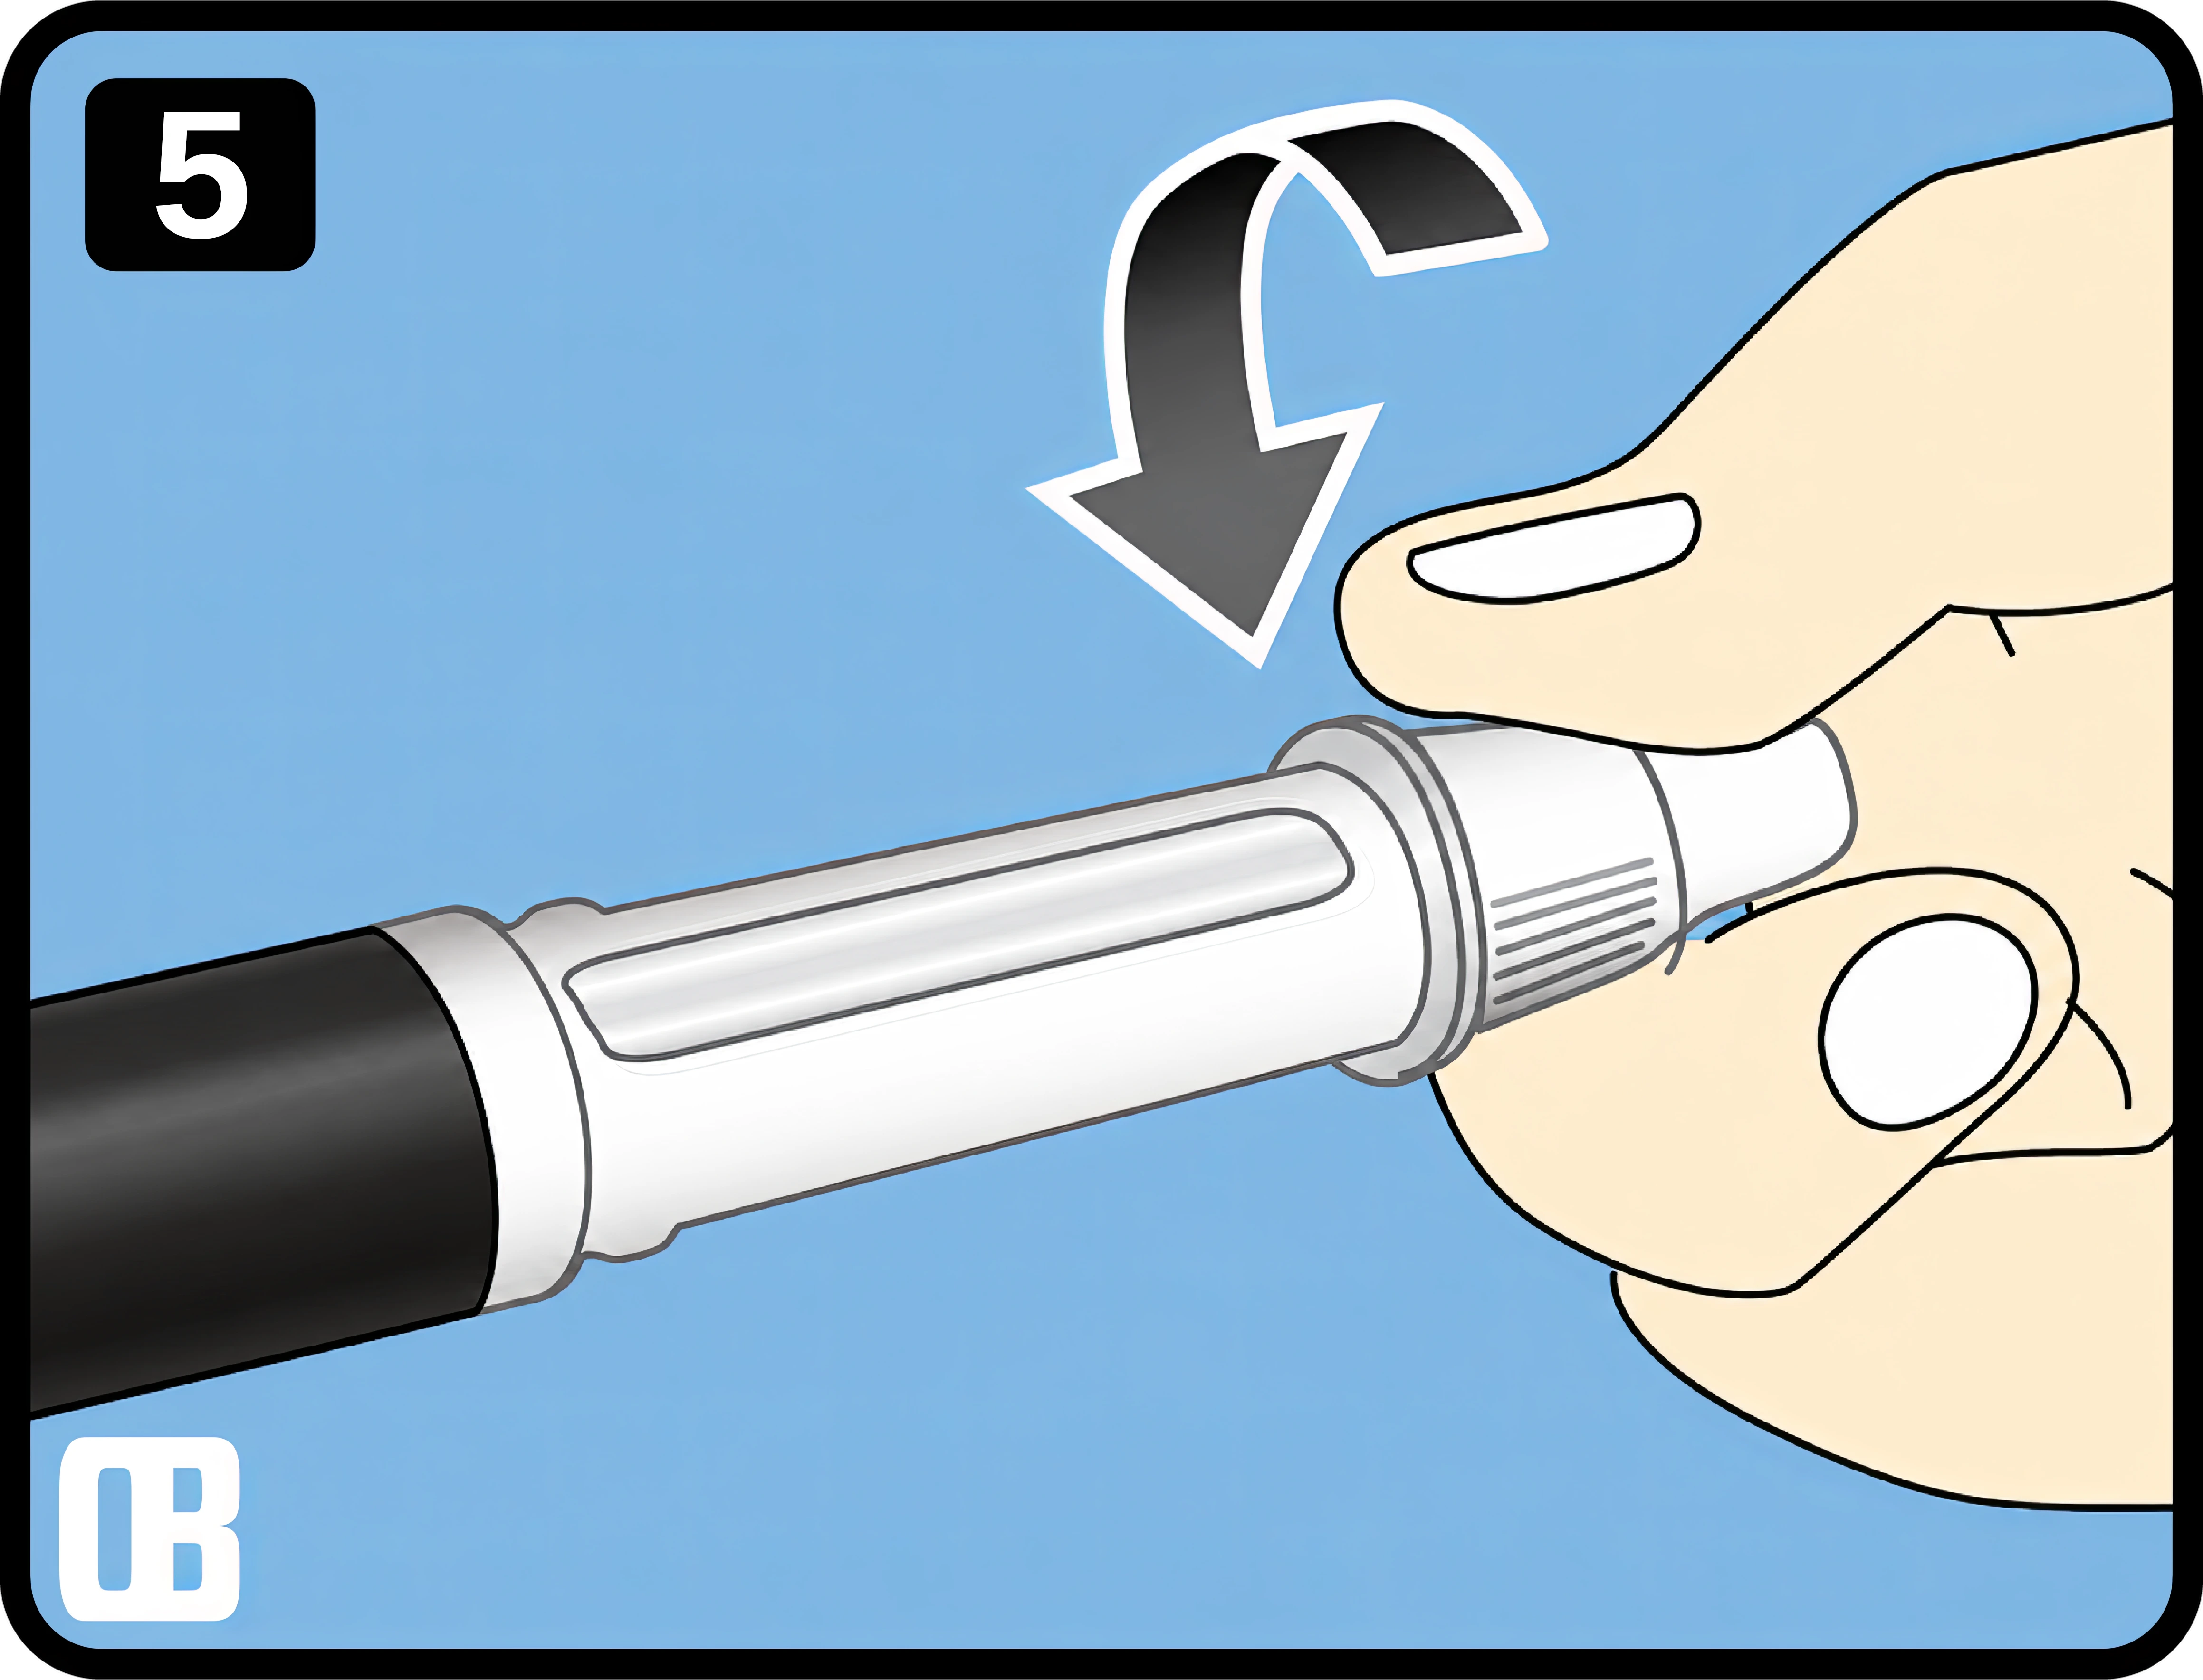
5

Secure the Needle End

Attach the needle section firmly before use.

  • Align the needle end with the pen tip.
  • Tighten only until secure; do not overtighten.
  • Confirm the needle end is stable before priming.

Important Note

Avoid touching the needle or exposed tip during setup.

Secure the Needle End
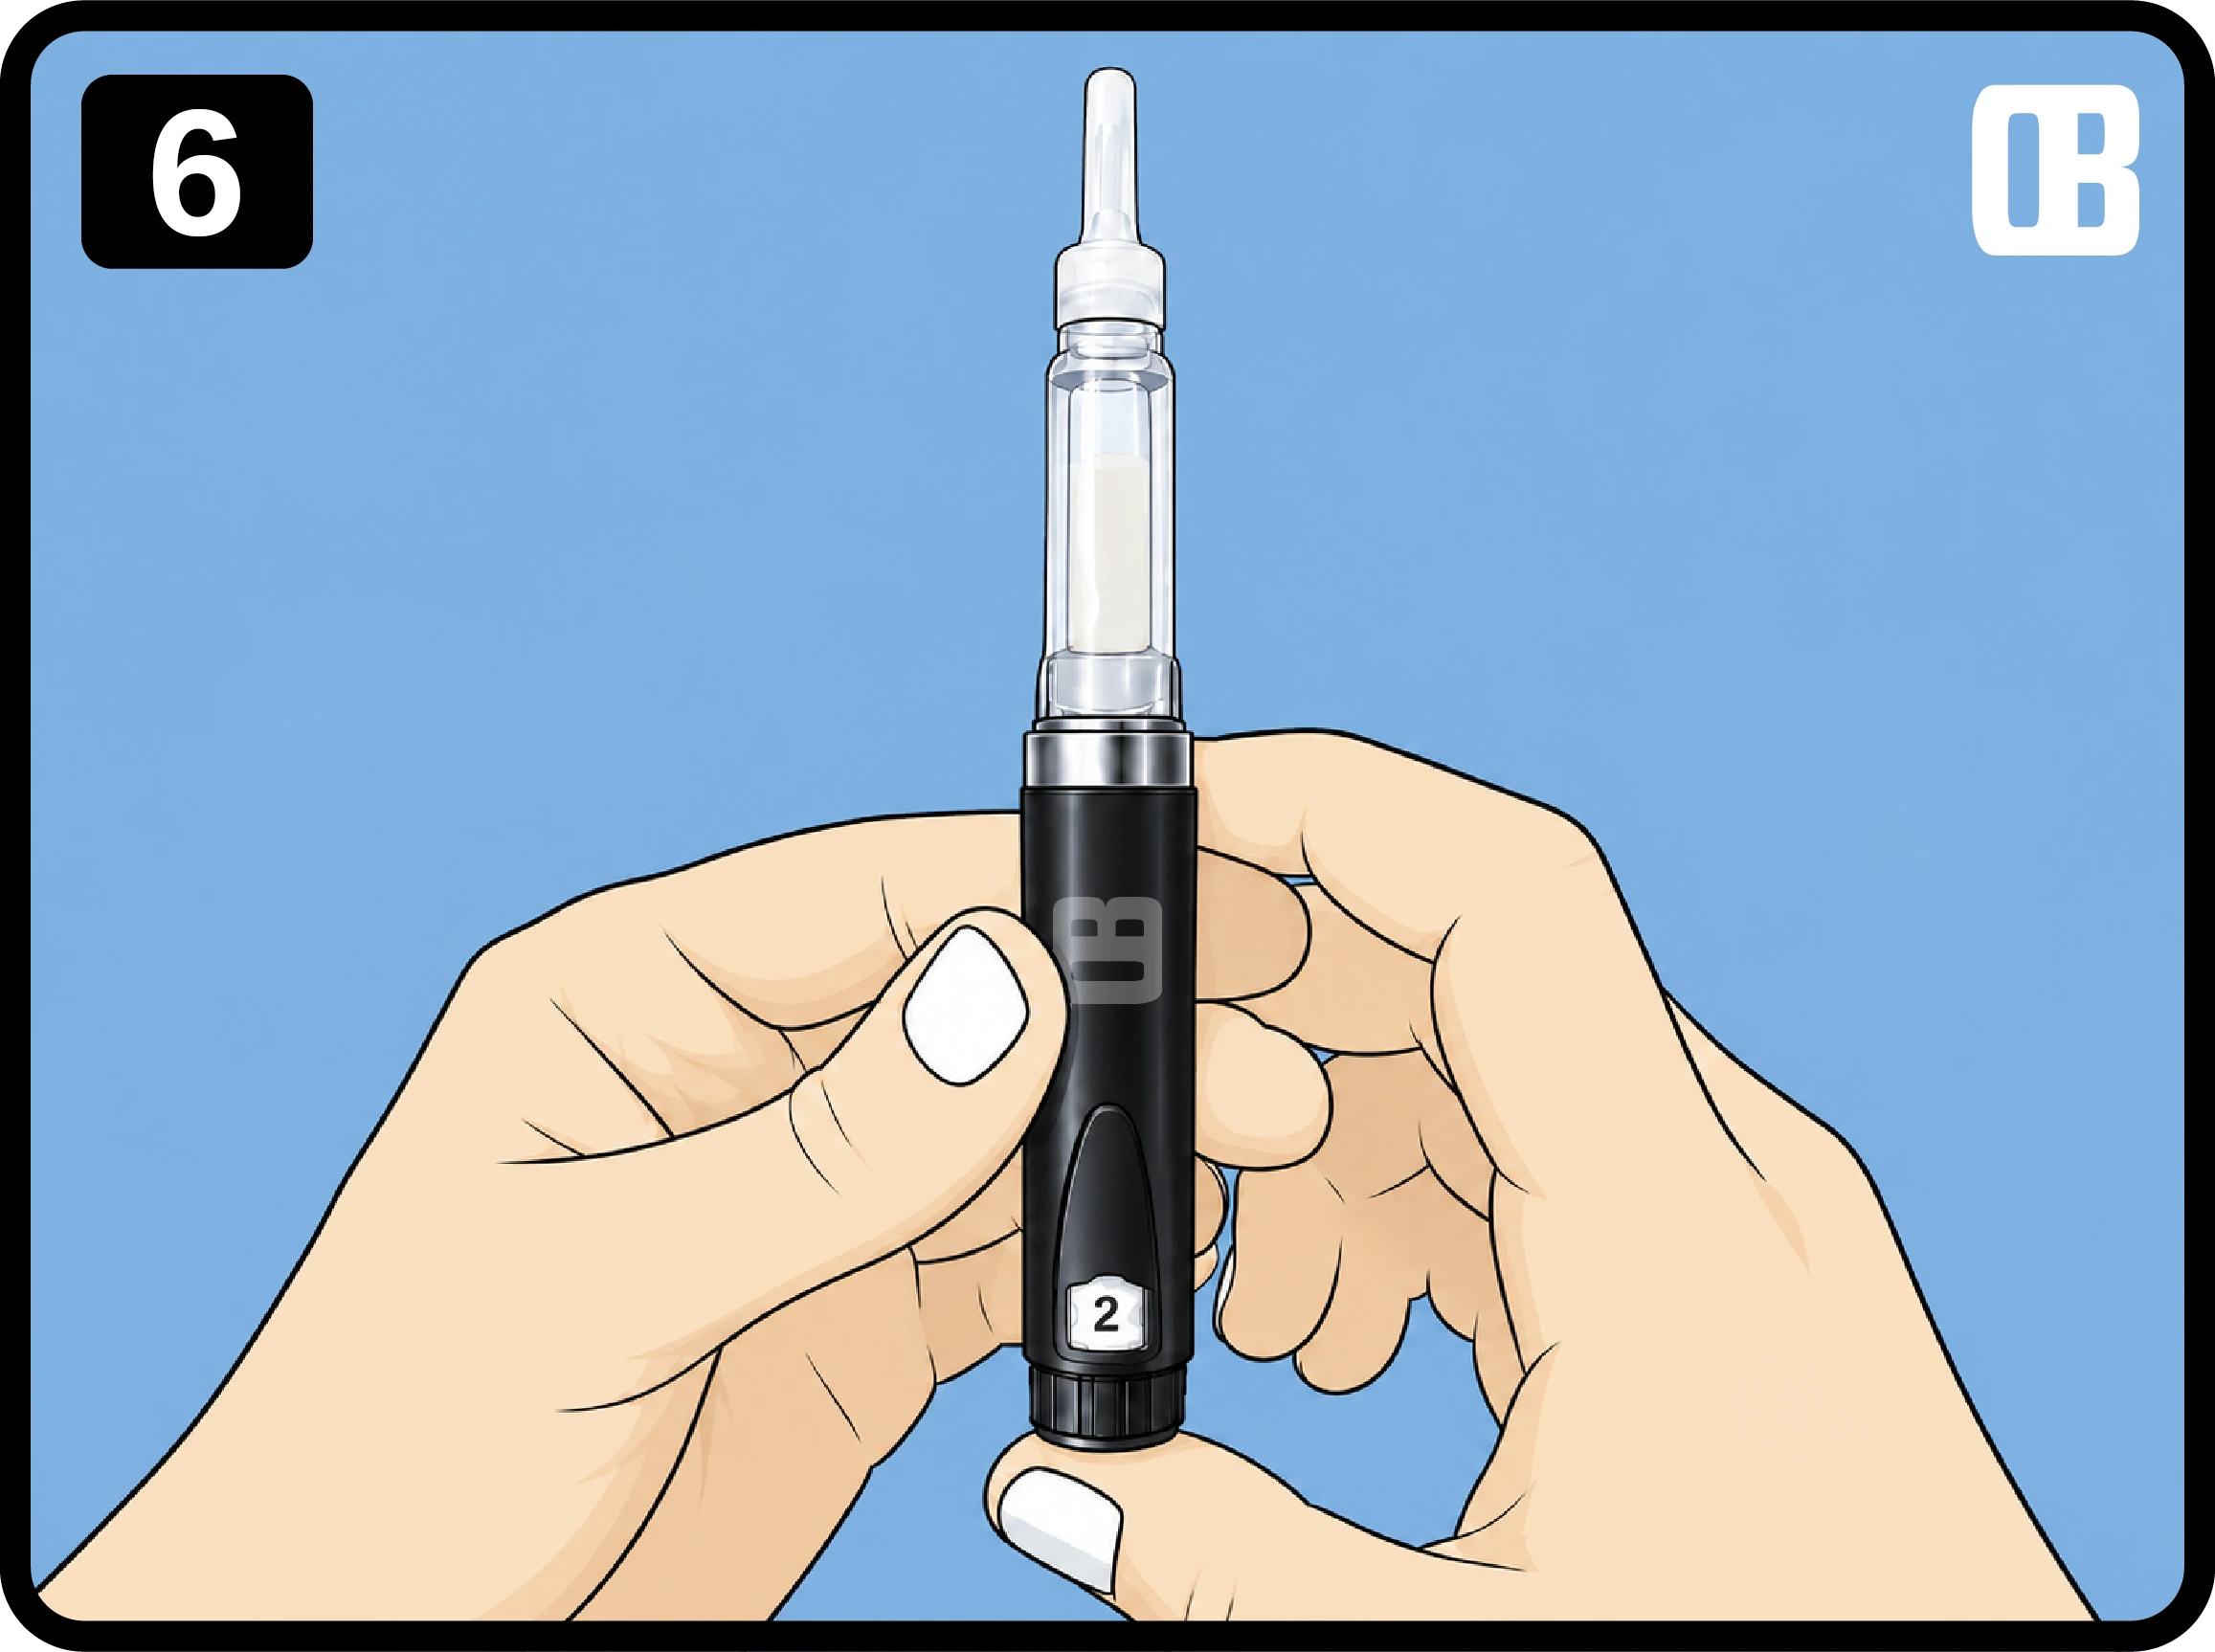
6

Priming a new cartridge

Repeat 1-2 clicks until plunger is connected with the cartridge.

  • Hold the pen upright for priming.
  • Check no air is stuck in the carttridge tip.
  • When you see droplets on the needle tip the priming is complete.

Important Note

Optional: before priming turn upside down and shake to remove any air from the neck of the cartridge.

Priming a new cartridge
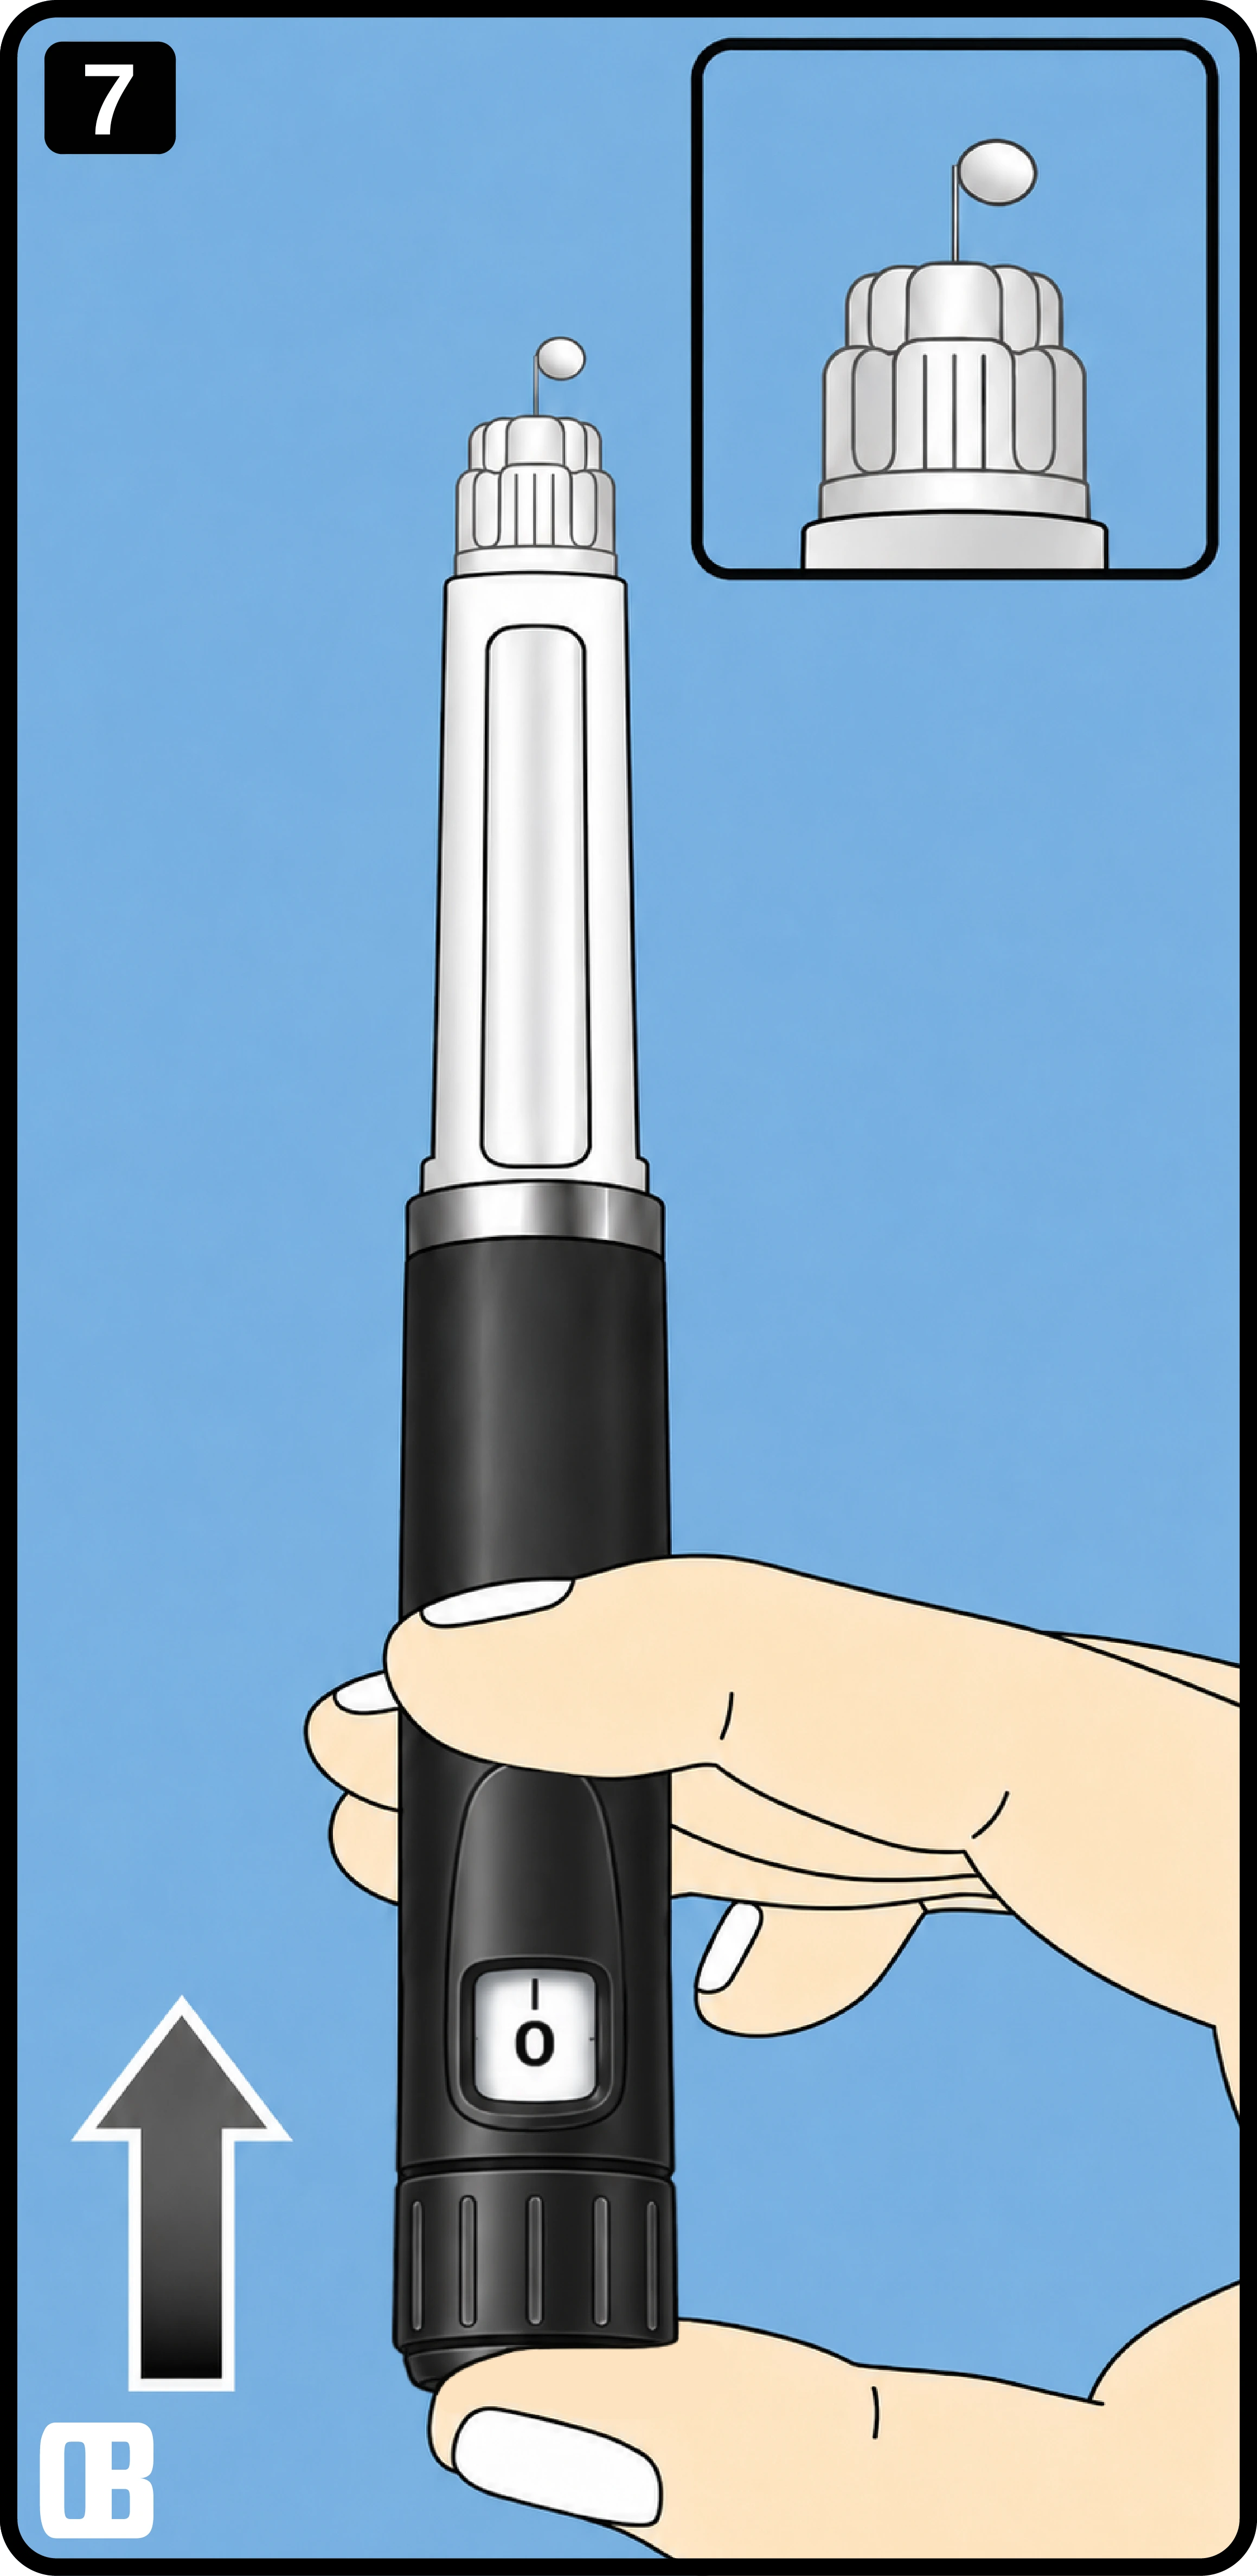
7

Expose the Needle

Remove the top cover so the needle area is ready for injection.

  • Remove the cap in a straight motion.
  • Avoid twisting the cover unless instructed.
  • Keep the exposed tip pointed safely away from the body.

Important Note

Once exposed, the needle area should be handled with extra care.

Expose the Needle
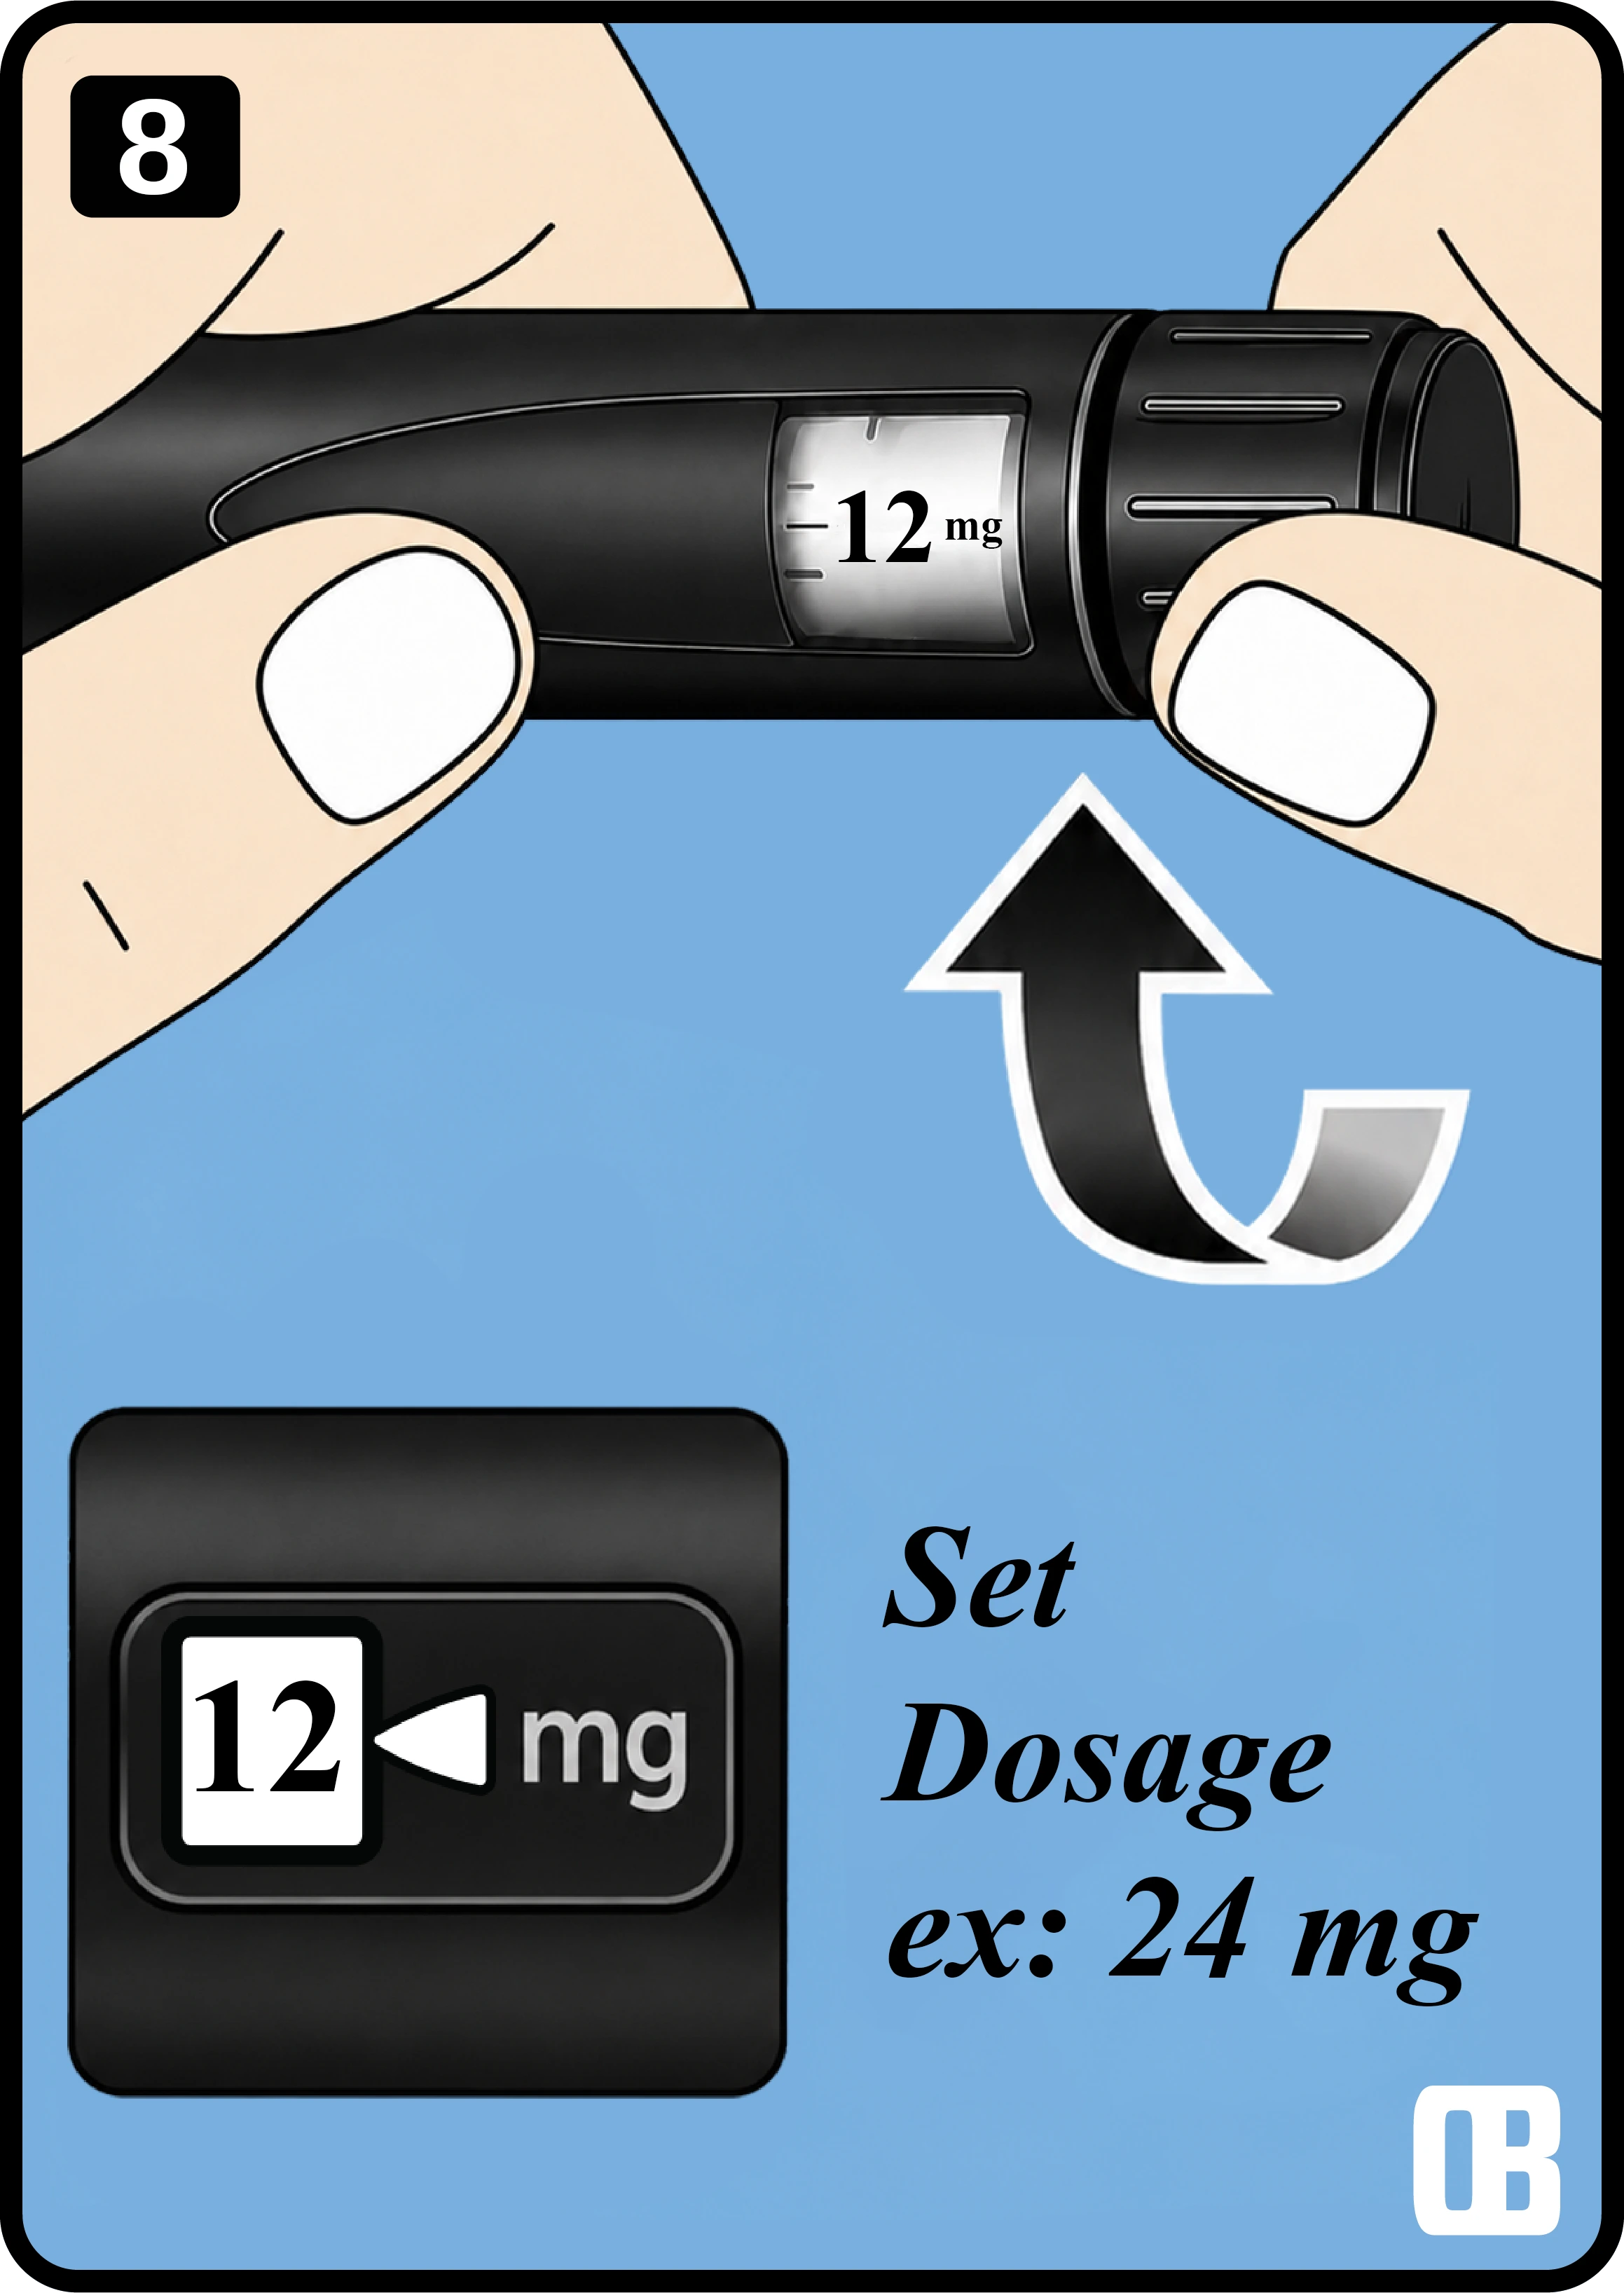
8

Set the Dosage

Turn the dose selector to the prescribed amount before injection.

  • Rotate the selector slowly to the target dosage.
  • Verify the displayed amount matches the prescription.
  • Recheck the setting before moving to the injection step.

Important Note

If your dosage is a odd number you can go up one click. For 25mg use 13 clicks to offset any droplets

Set the Dosage
9

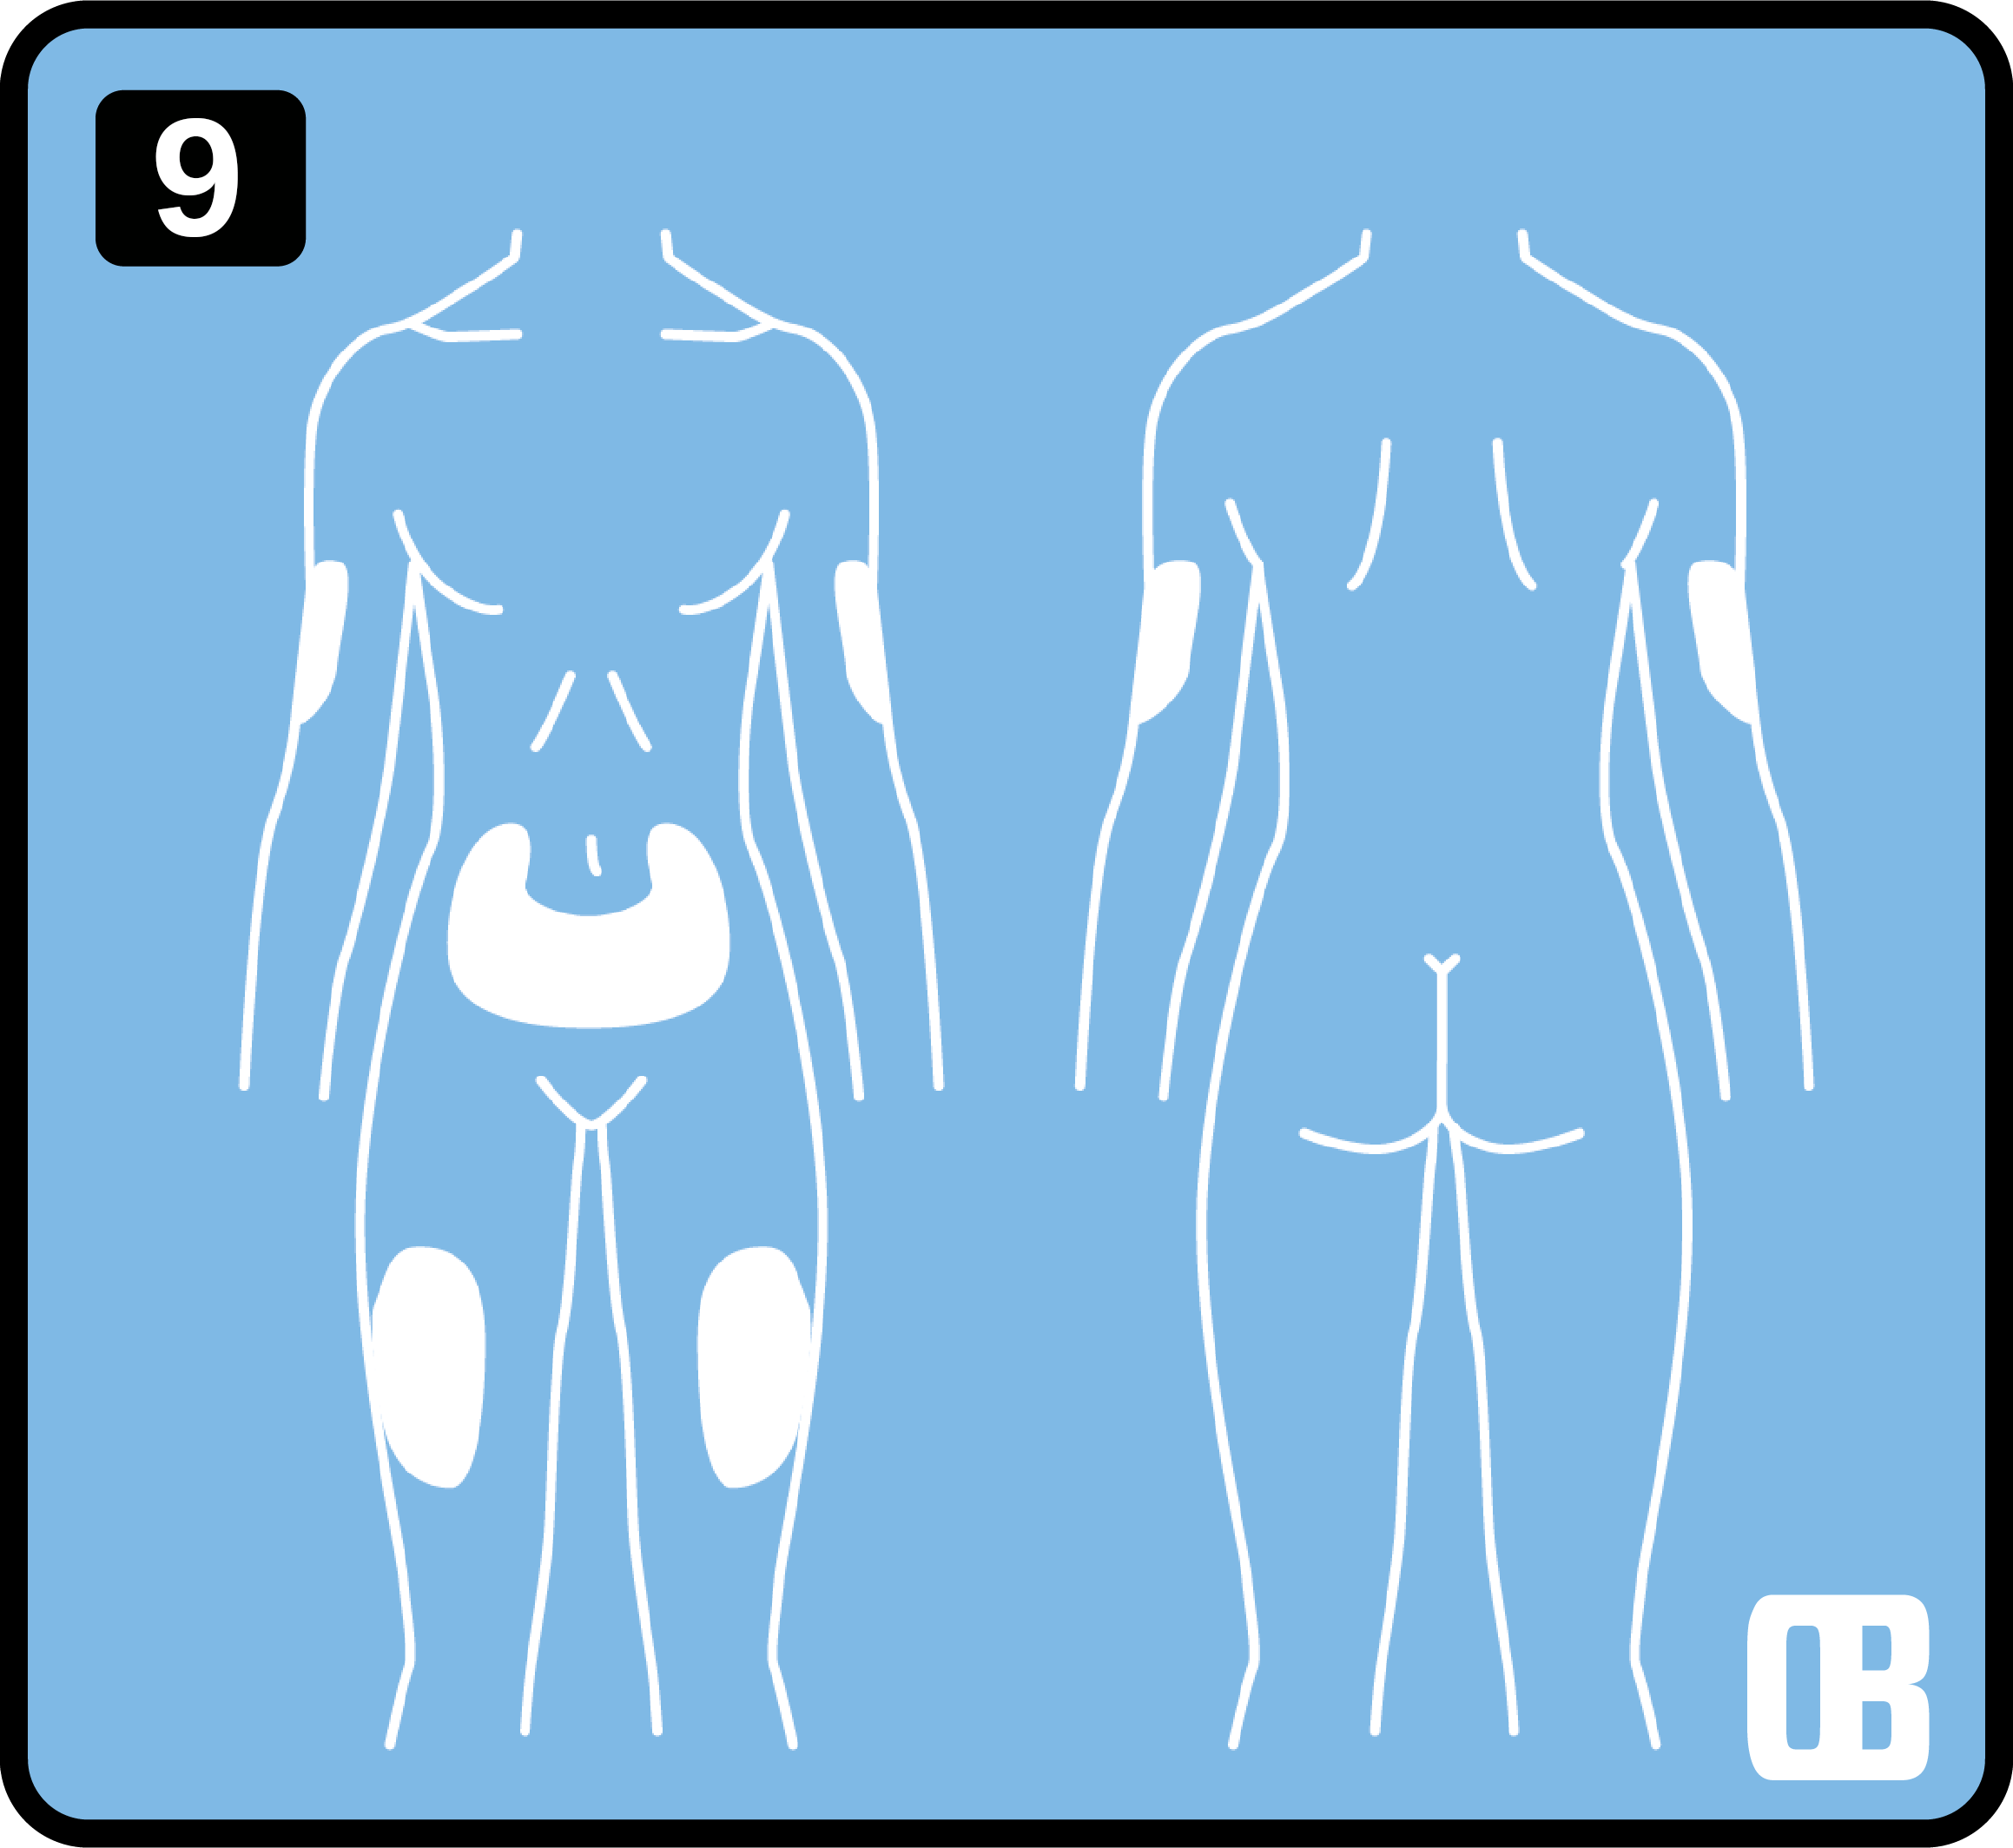
Choose an Injection Site

Use a recommended area such as the abdomen, thigh, or upper arm.

  • Select a site recommended by your healthcare provider.
  • Avoid irritated, bruised, or broken skin.
  • Rotate sites regularly to support comfort and consistency.

Important Note

Remember that You have the option to do both subcutaneous and intramuscular injections with this product.

Choose an Injection Site
10

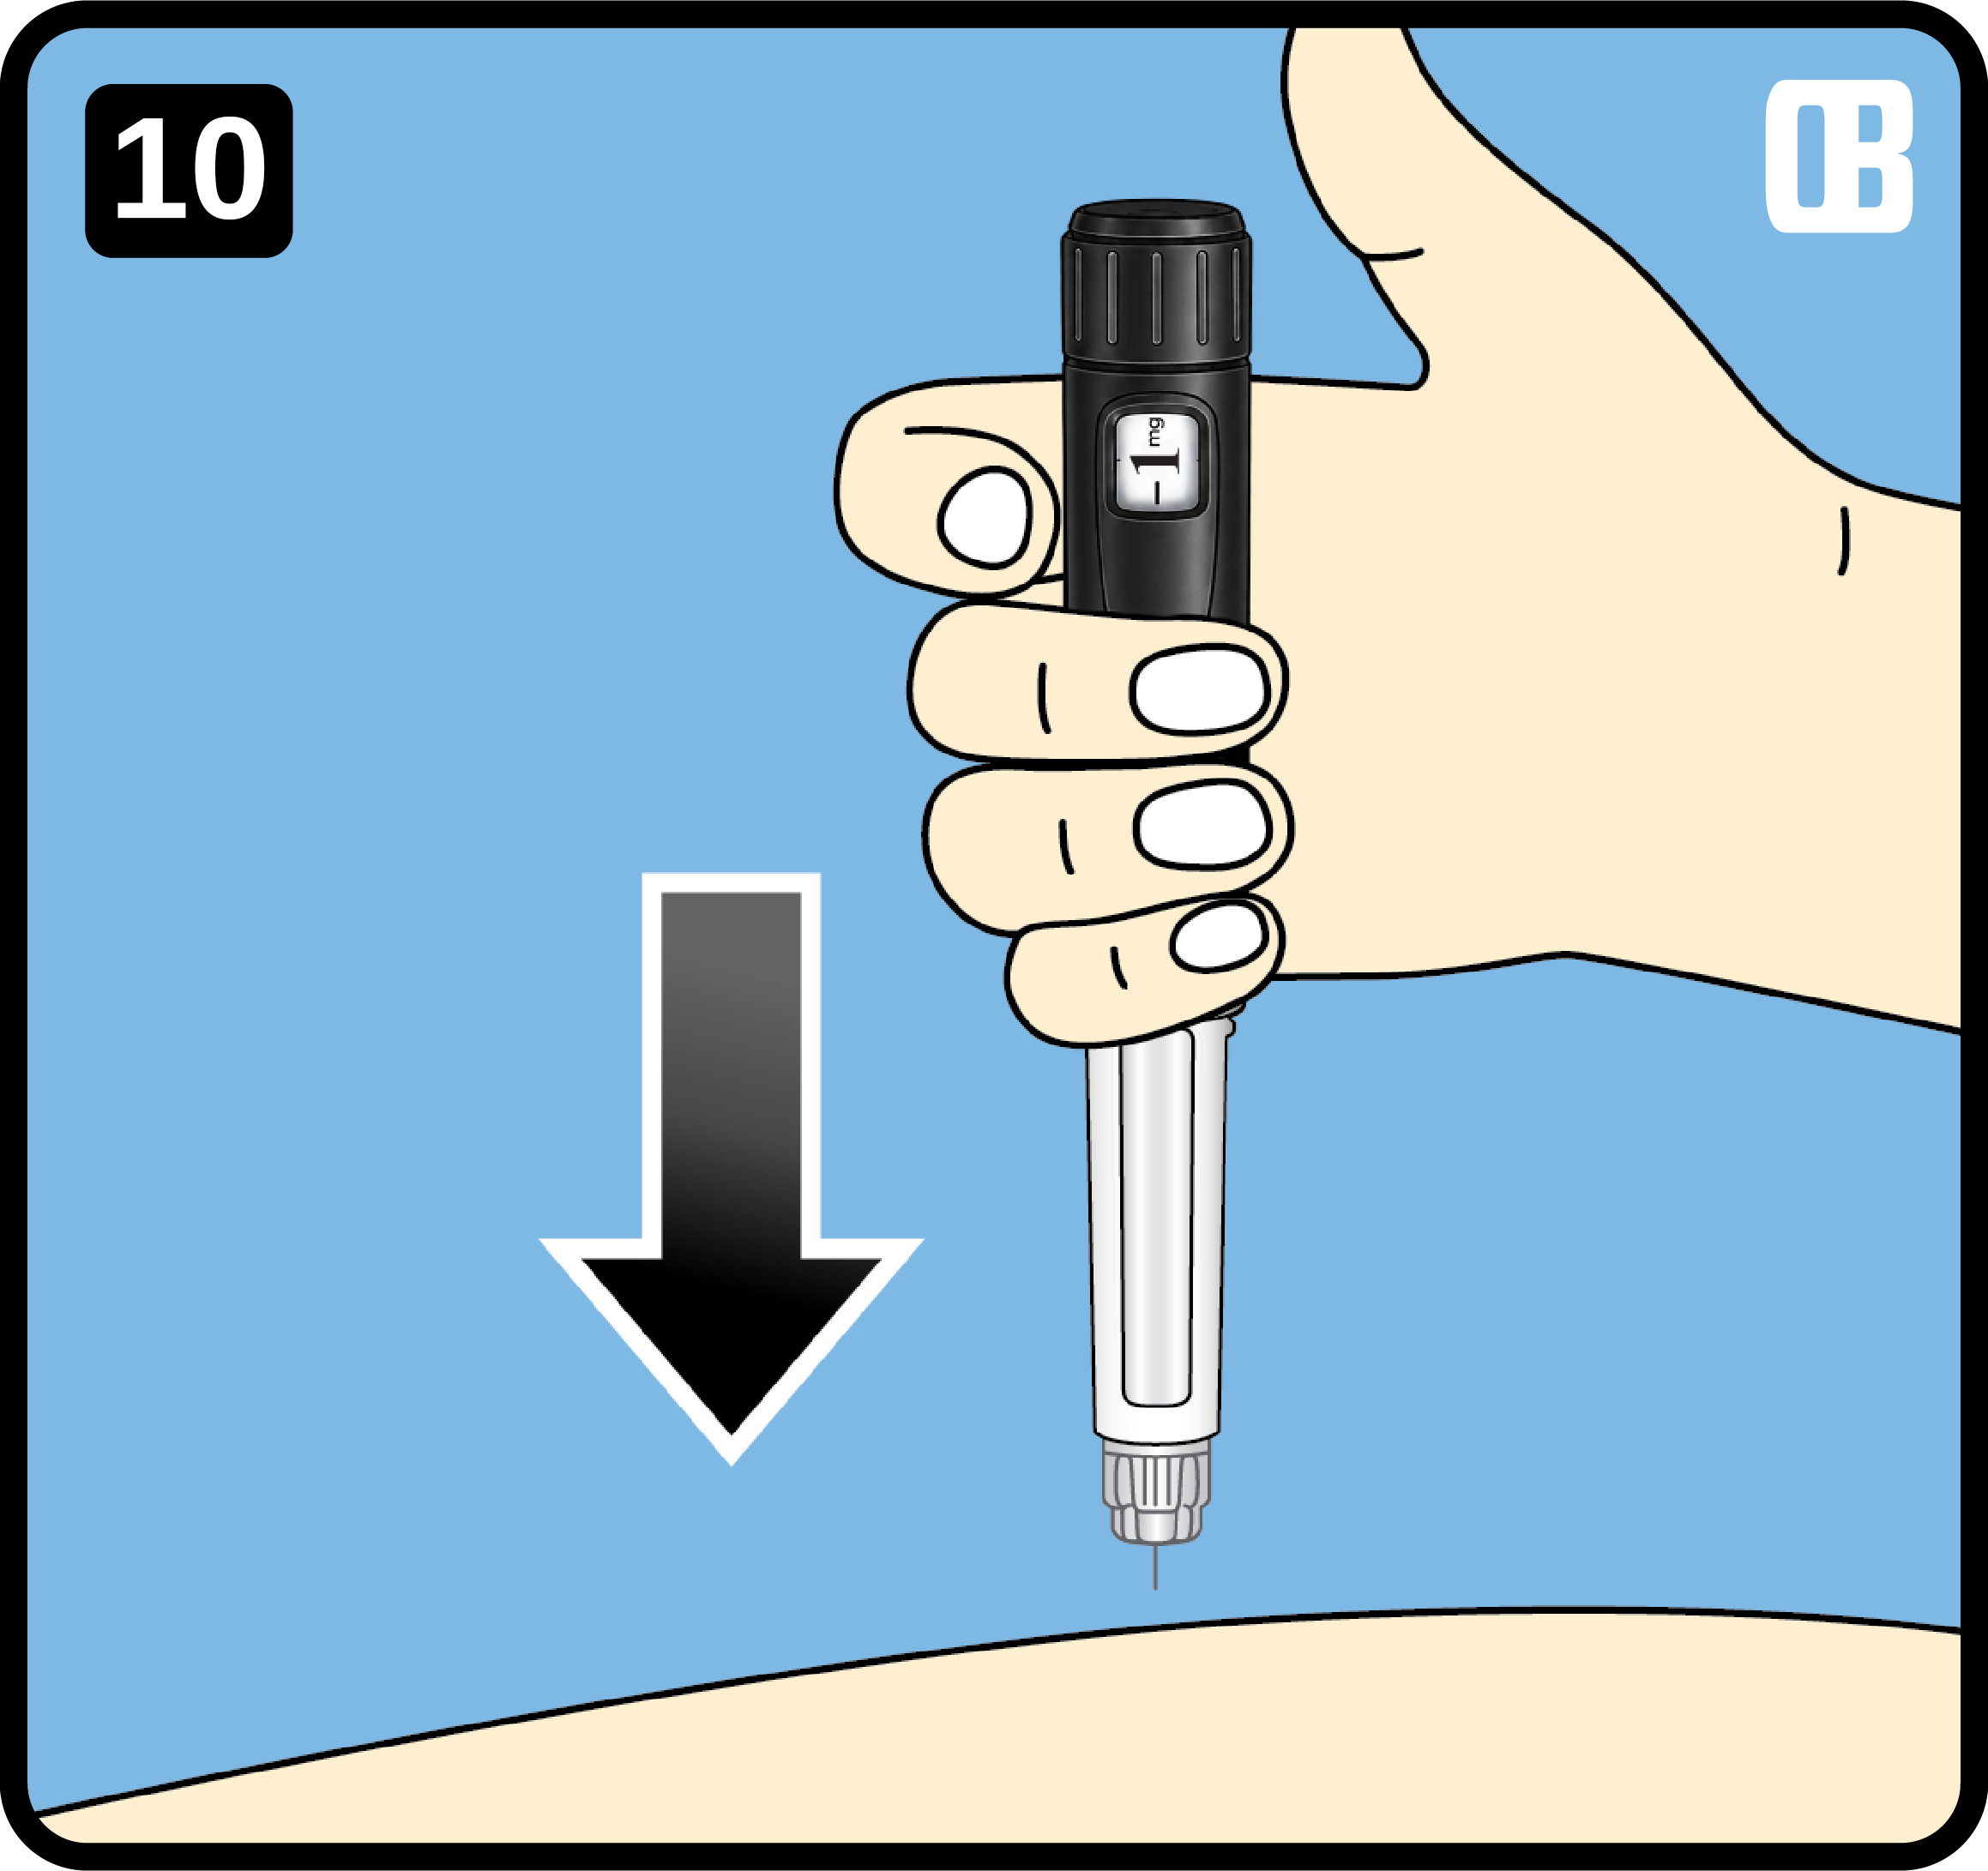
Position the Pen

Place the pen against the skin at the selected injection site.

  • Align the pen at the recommended angle.
  • Keep the device steady against the skin.
  • Confirm the position before beginning the injection.

Important Note

A stable position supports consistent delivery.

Position the Pen
11

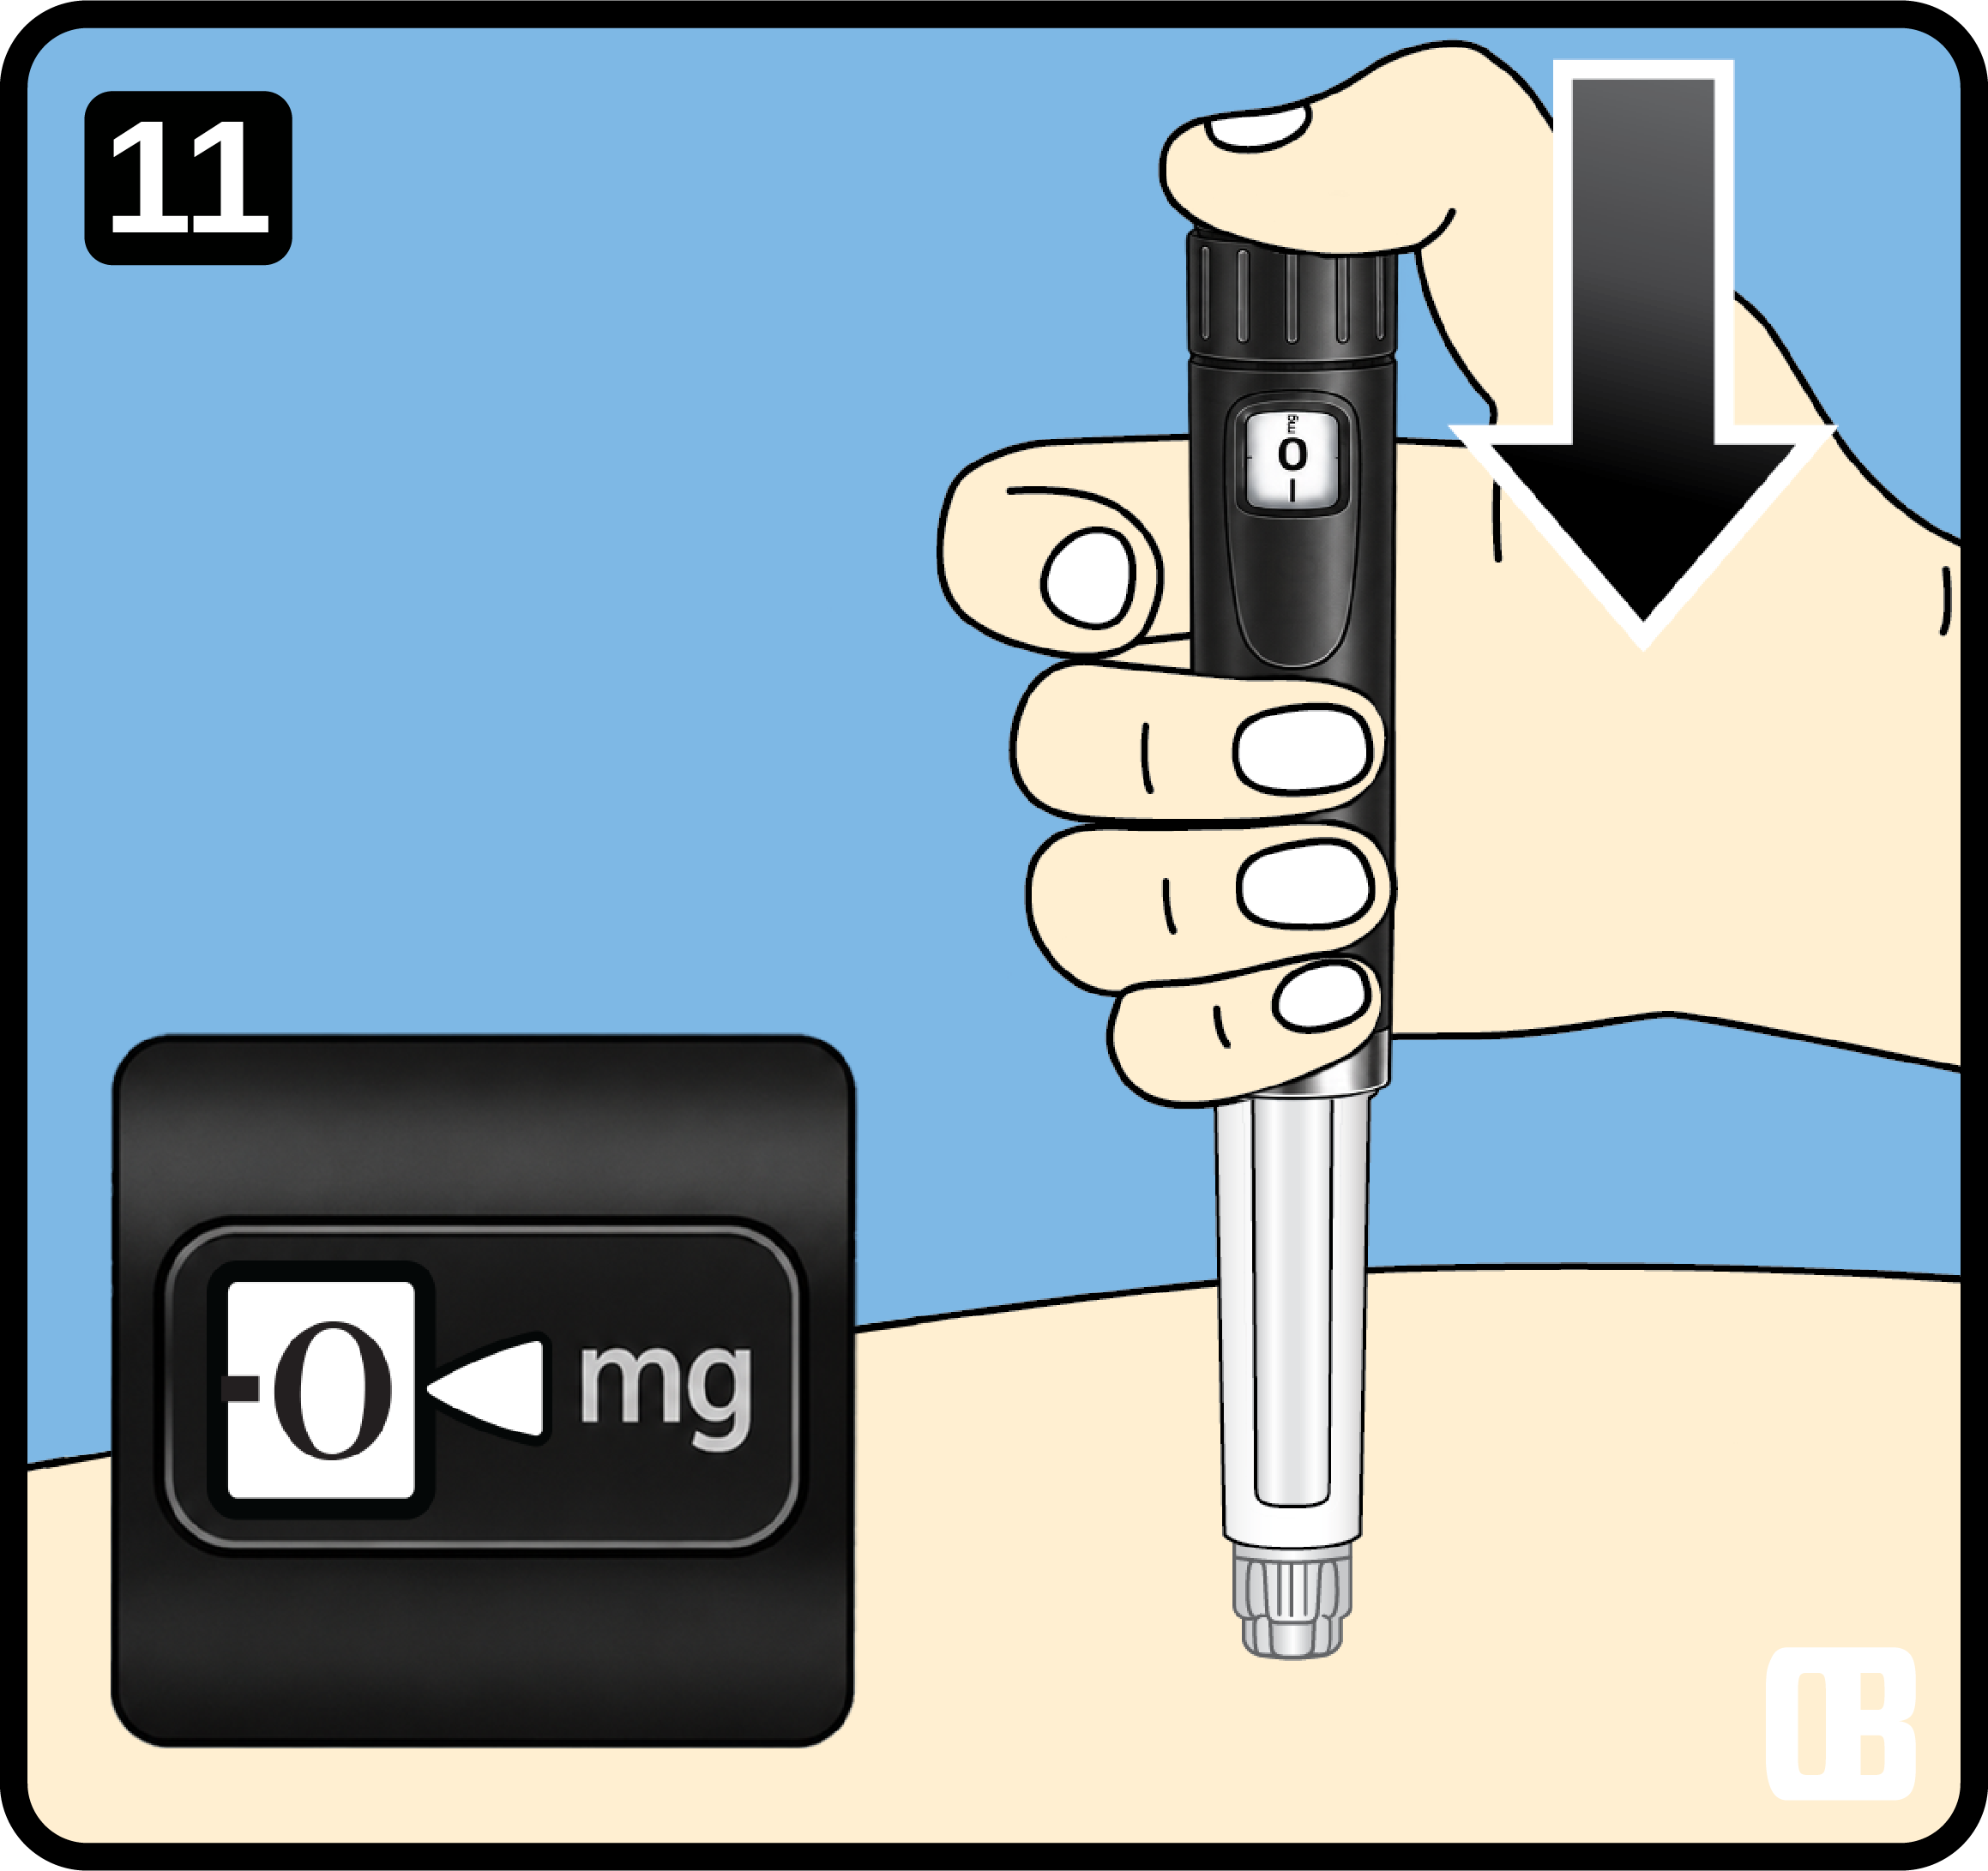
Begin the Injection

Press the pen down slowly and smoothly to deliver the dose.

  • Apply even pressure to start delivery.
  • Keep the pen aligned during administration.
  • Avoid abrupt movement while the dose is being delivered.

Important Note

Follow your prescribed technique exactly during administration.

Begin the Injection
12

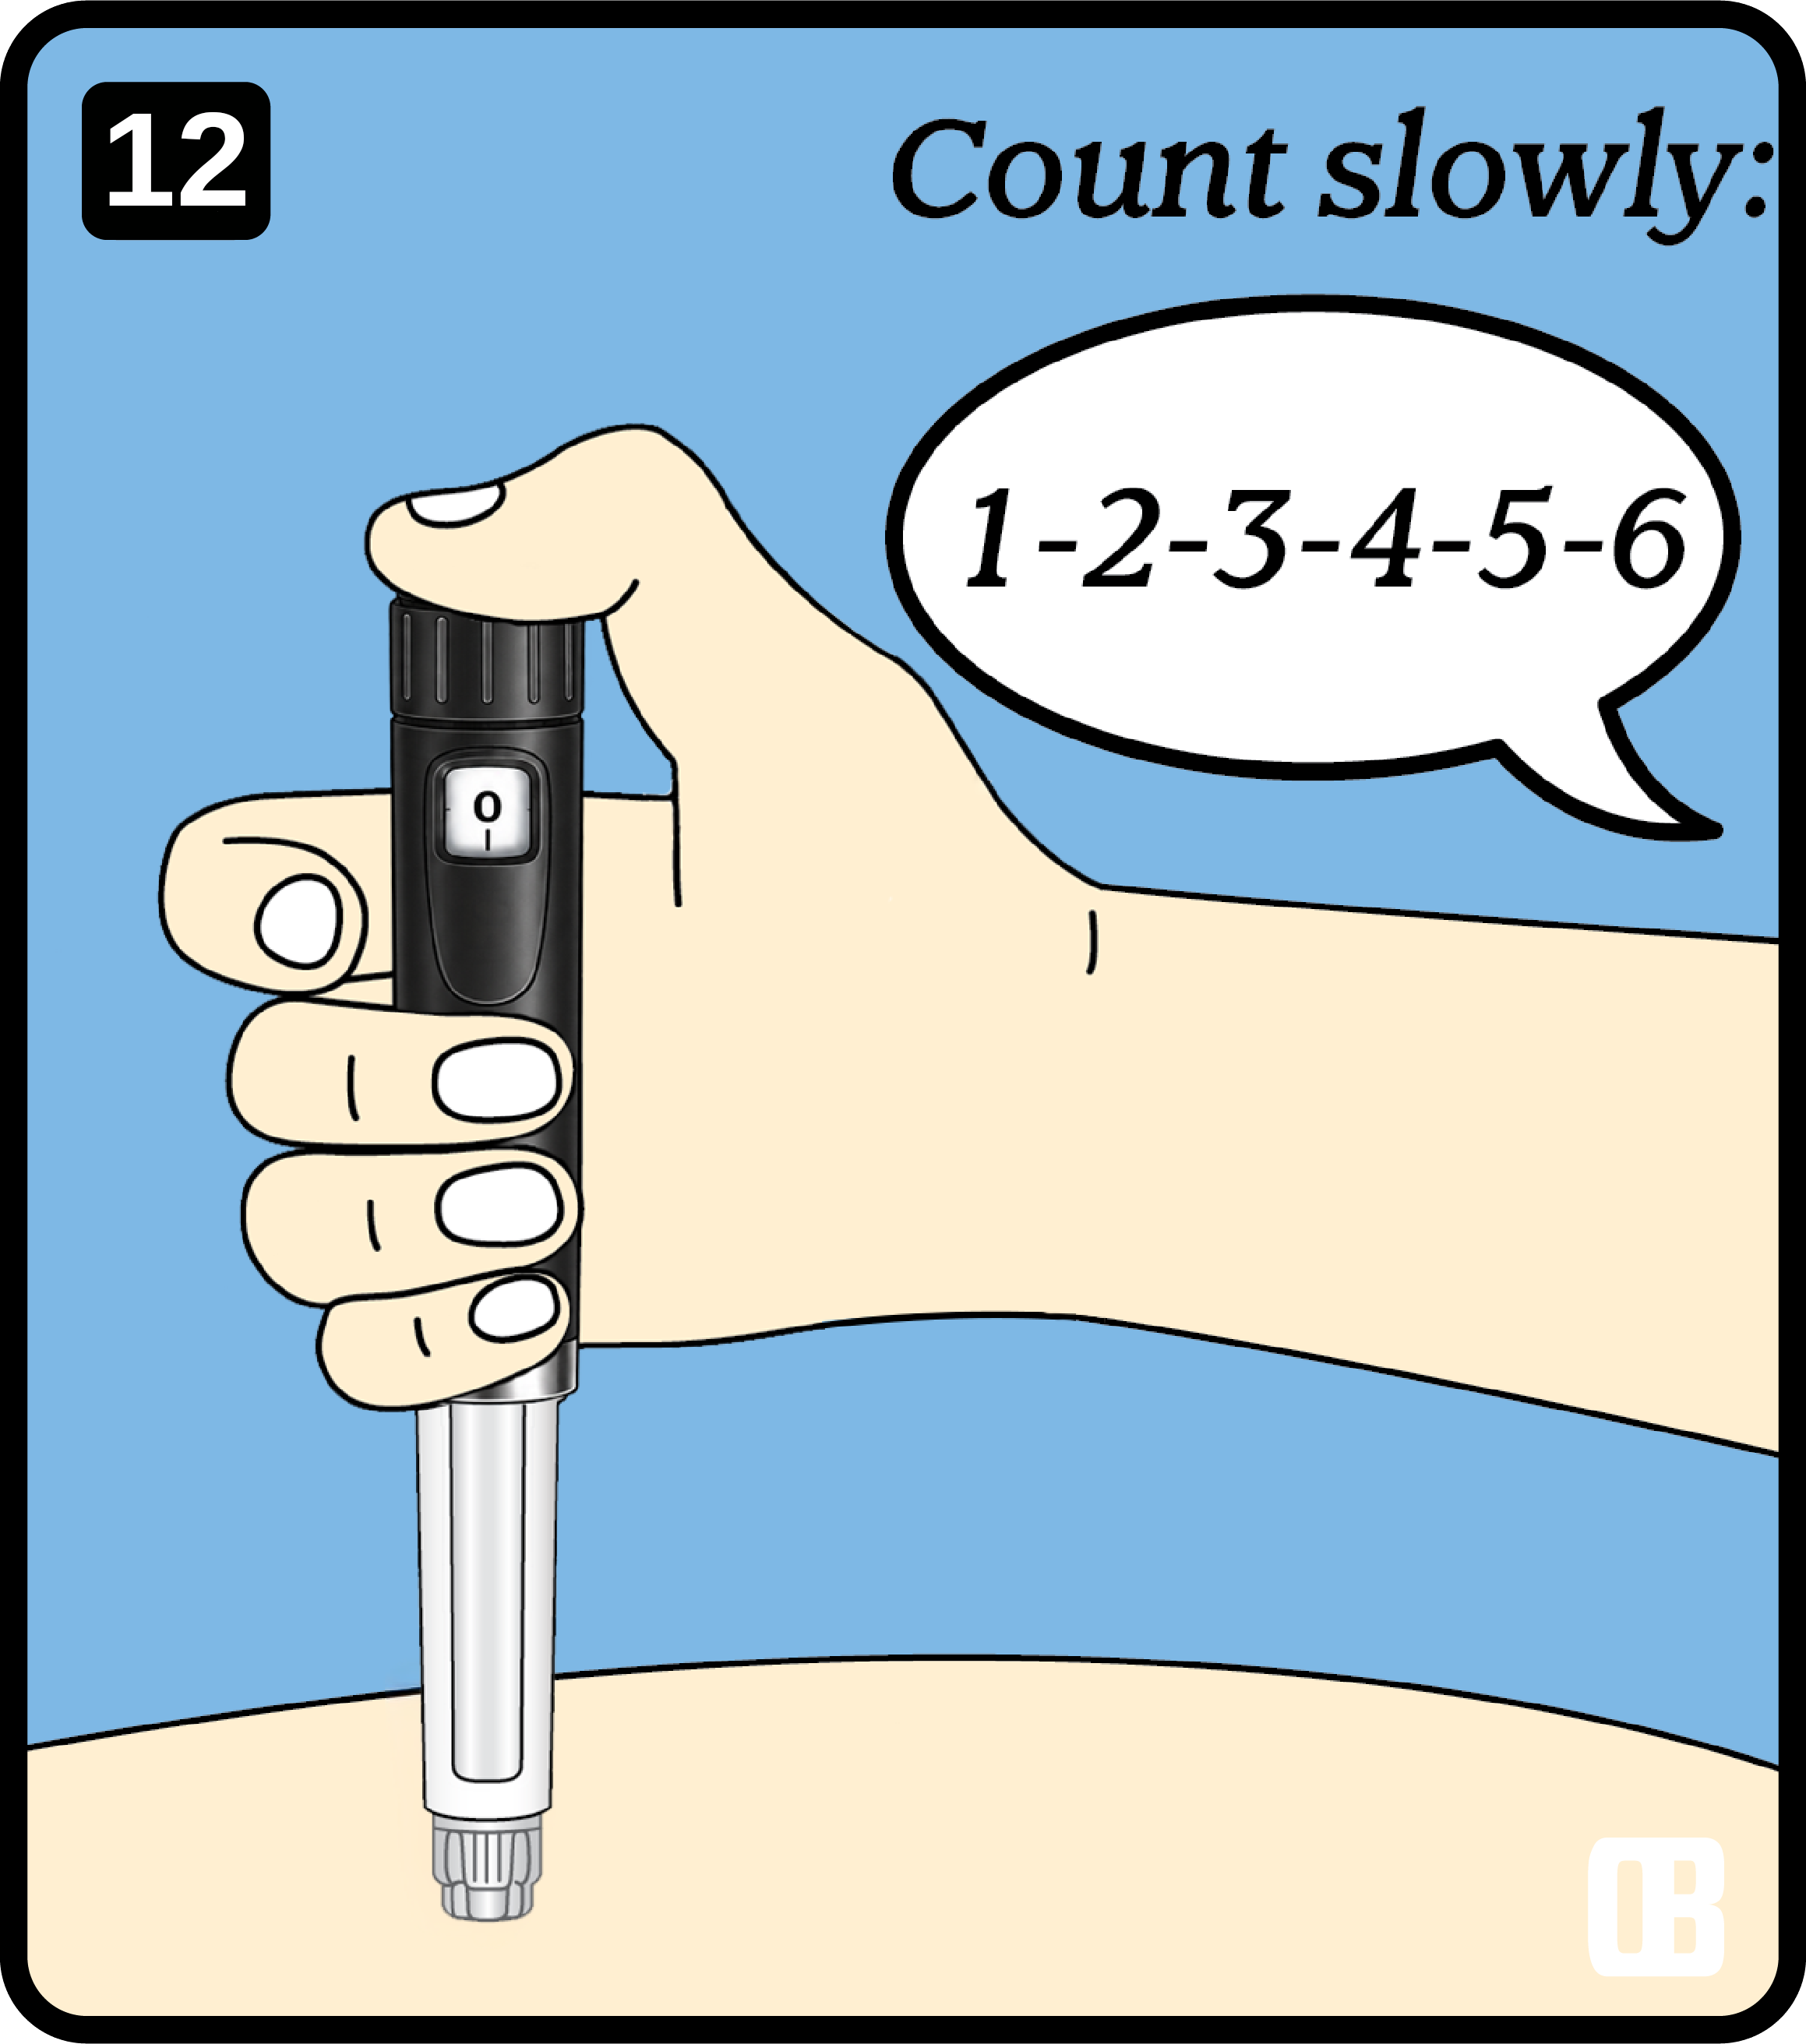
Count Slowly

Hold the pen in place and count slowly to allow the full dose to deliver.

  • Maintain steady contact throughout the count.
  • Count at a calm, even pace.
  • Do not remove the pen until the dose is complete.

Important Note

This pause helps support complete dose delivery.

Count Slowly
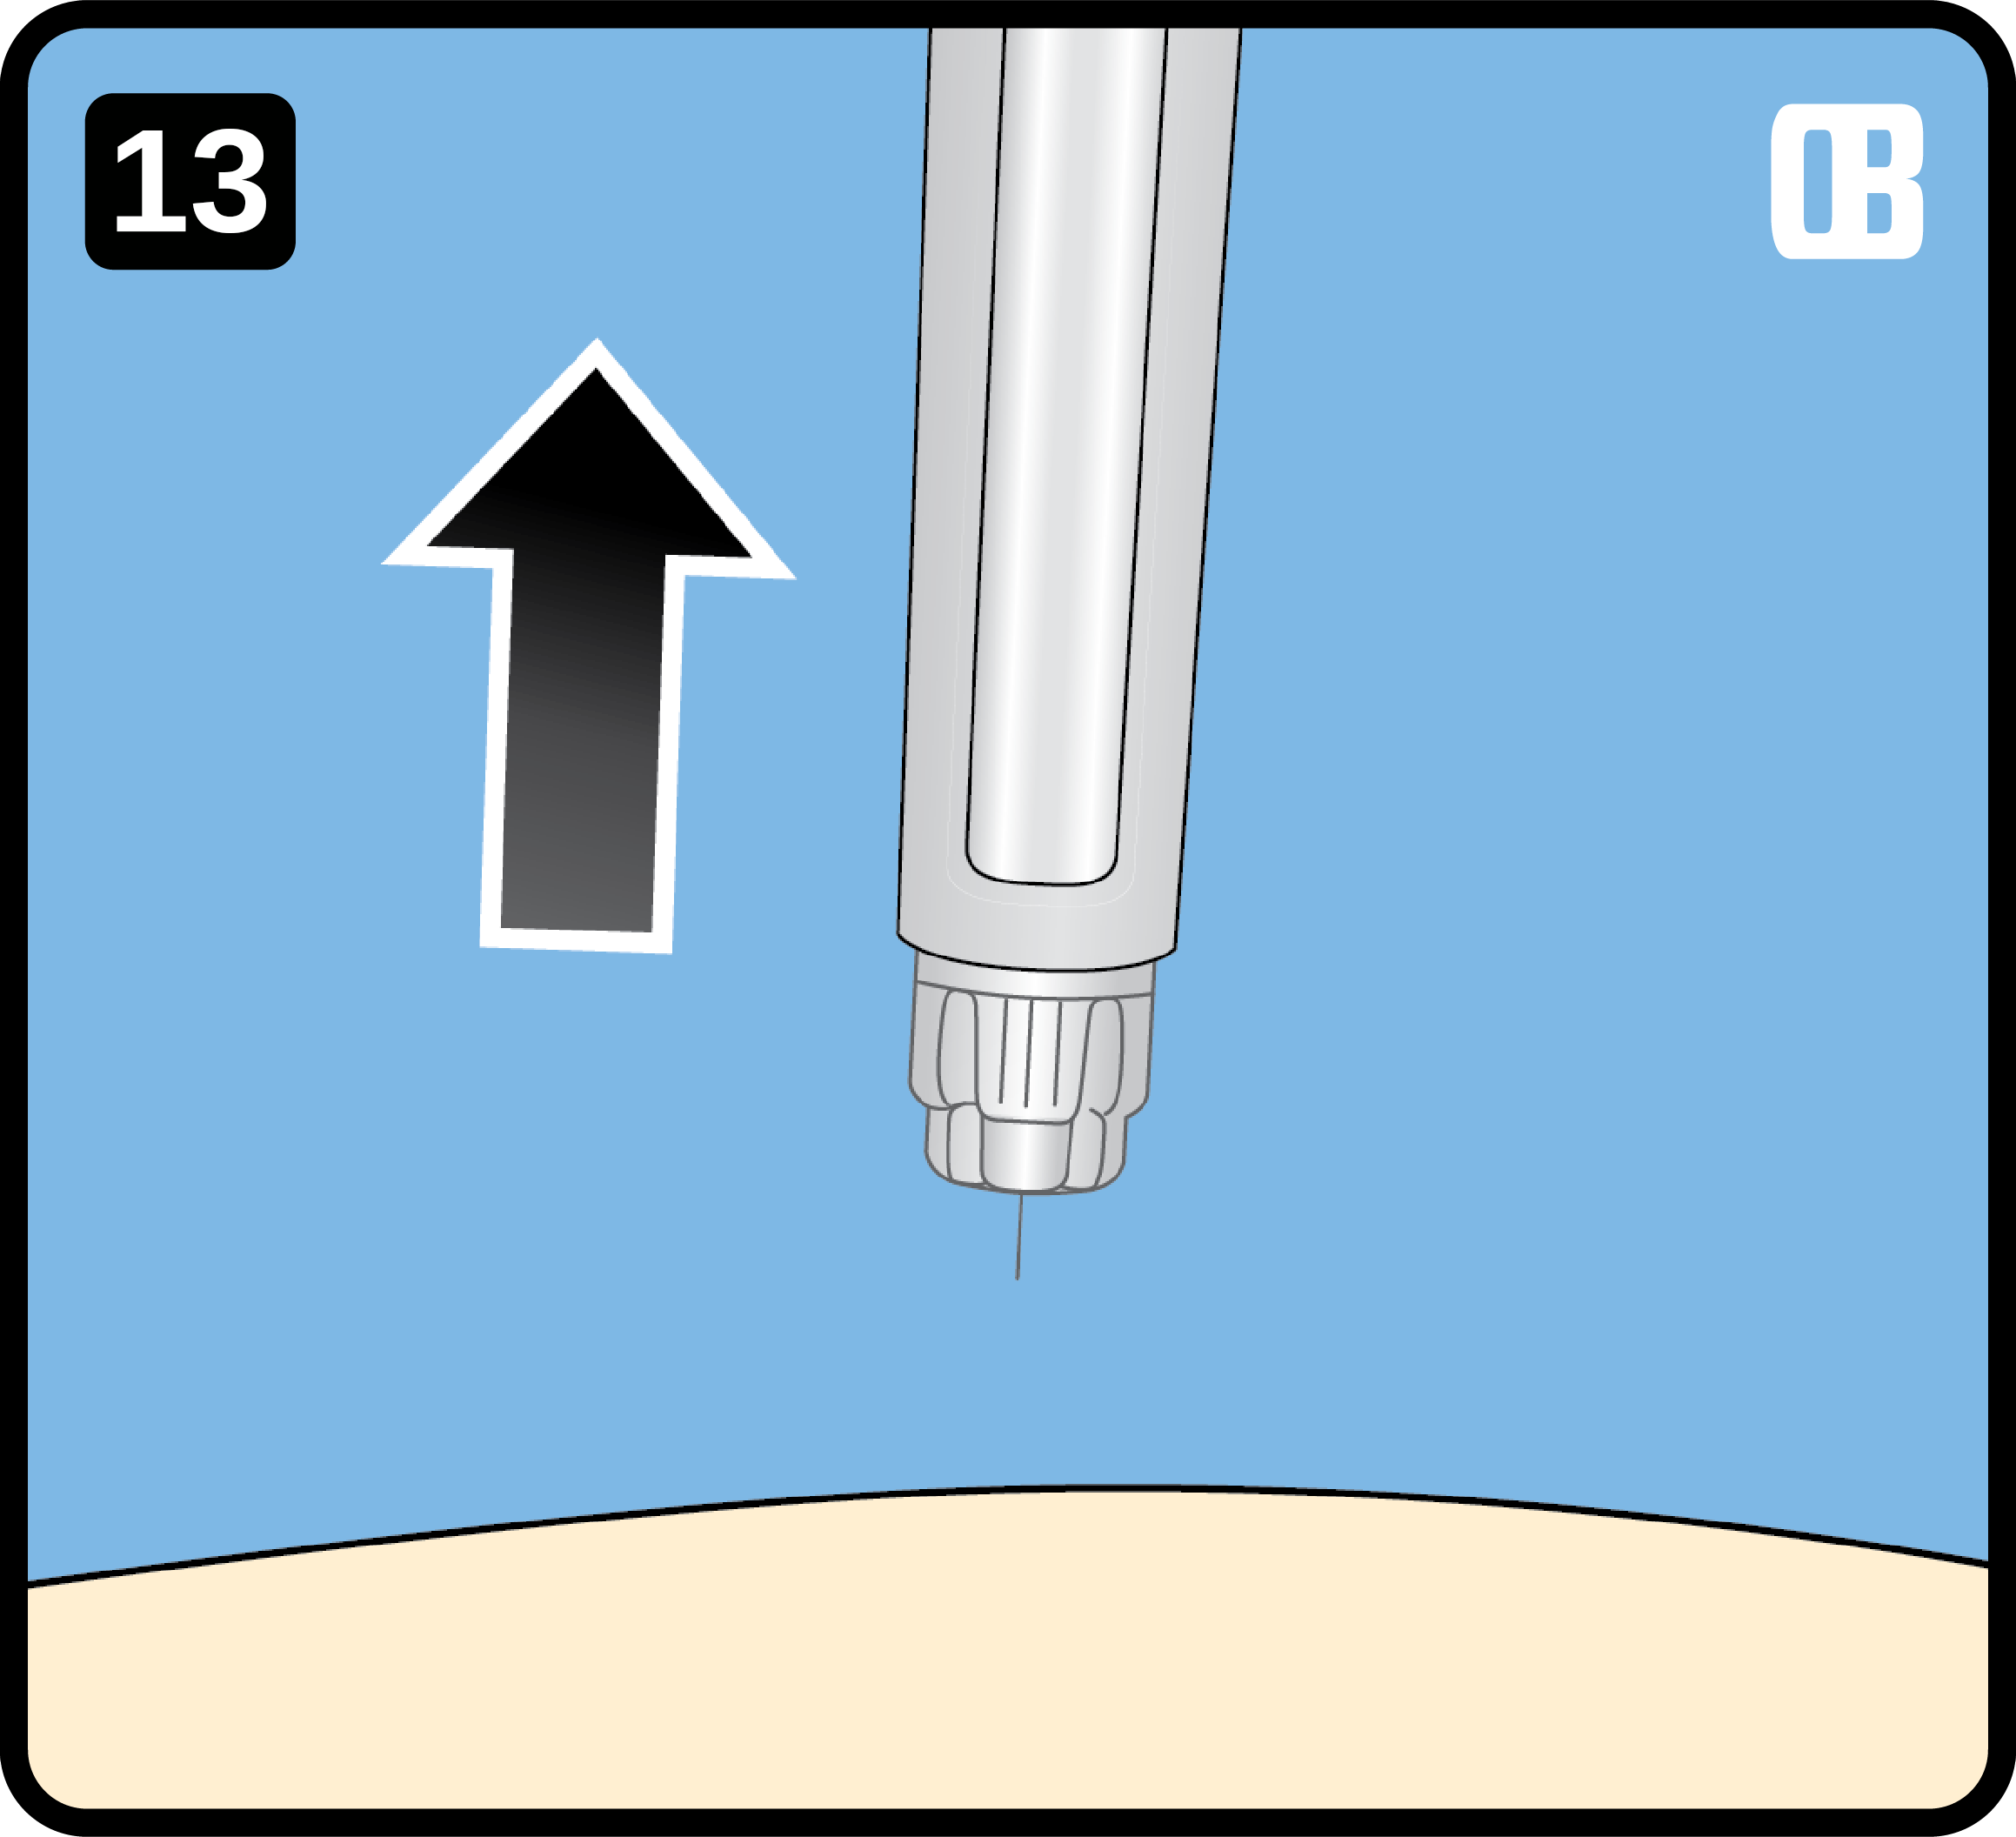
13

Withdraw the Needle

Lift the pen away from the skin once the injection is complete.

  • Remove the pen gently and in a straight motion.
  • Inspect the site for any immediate reaction.
  • Keep the used device pointed away from the body.

Important Note

Withdraw smoothly to avoid unnecessary discomfort.

Withdraw the Needle
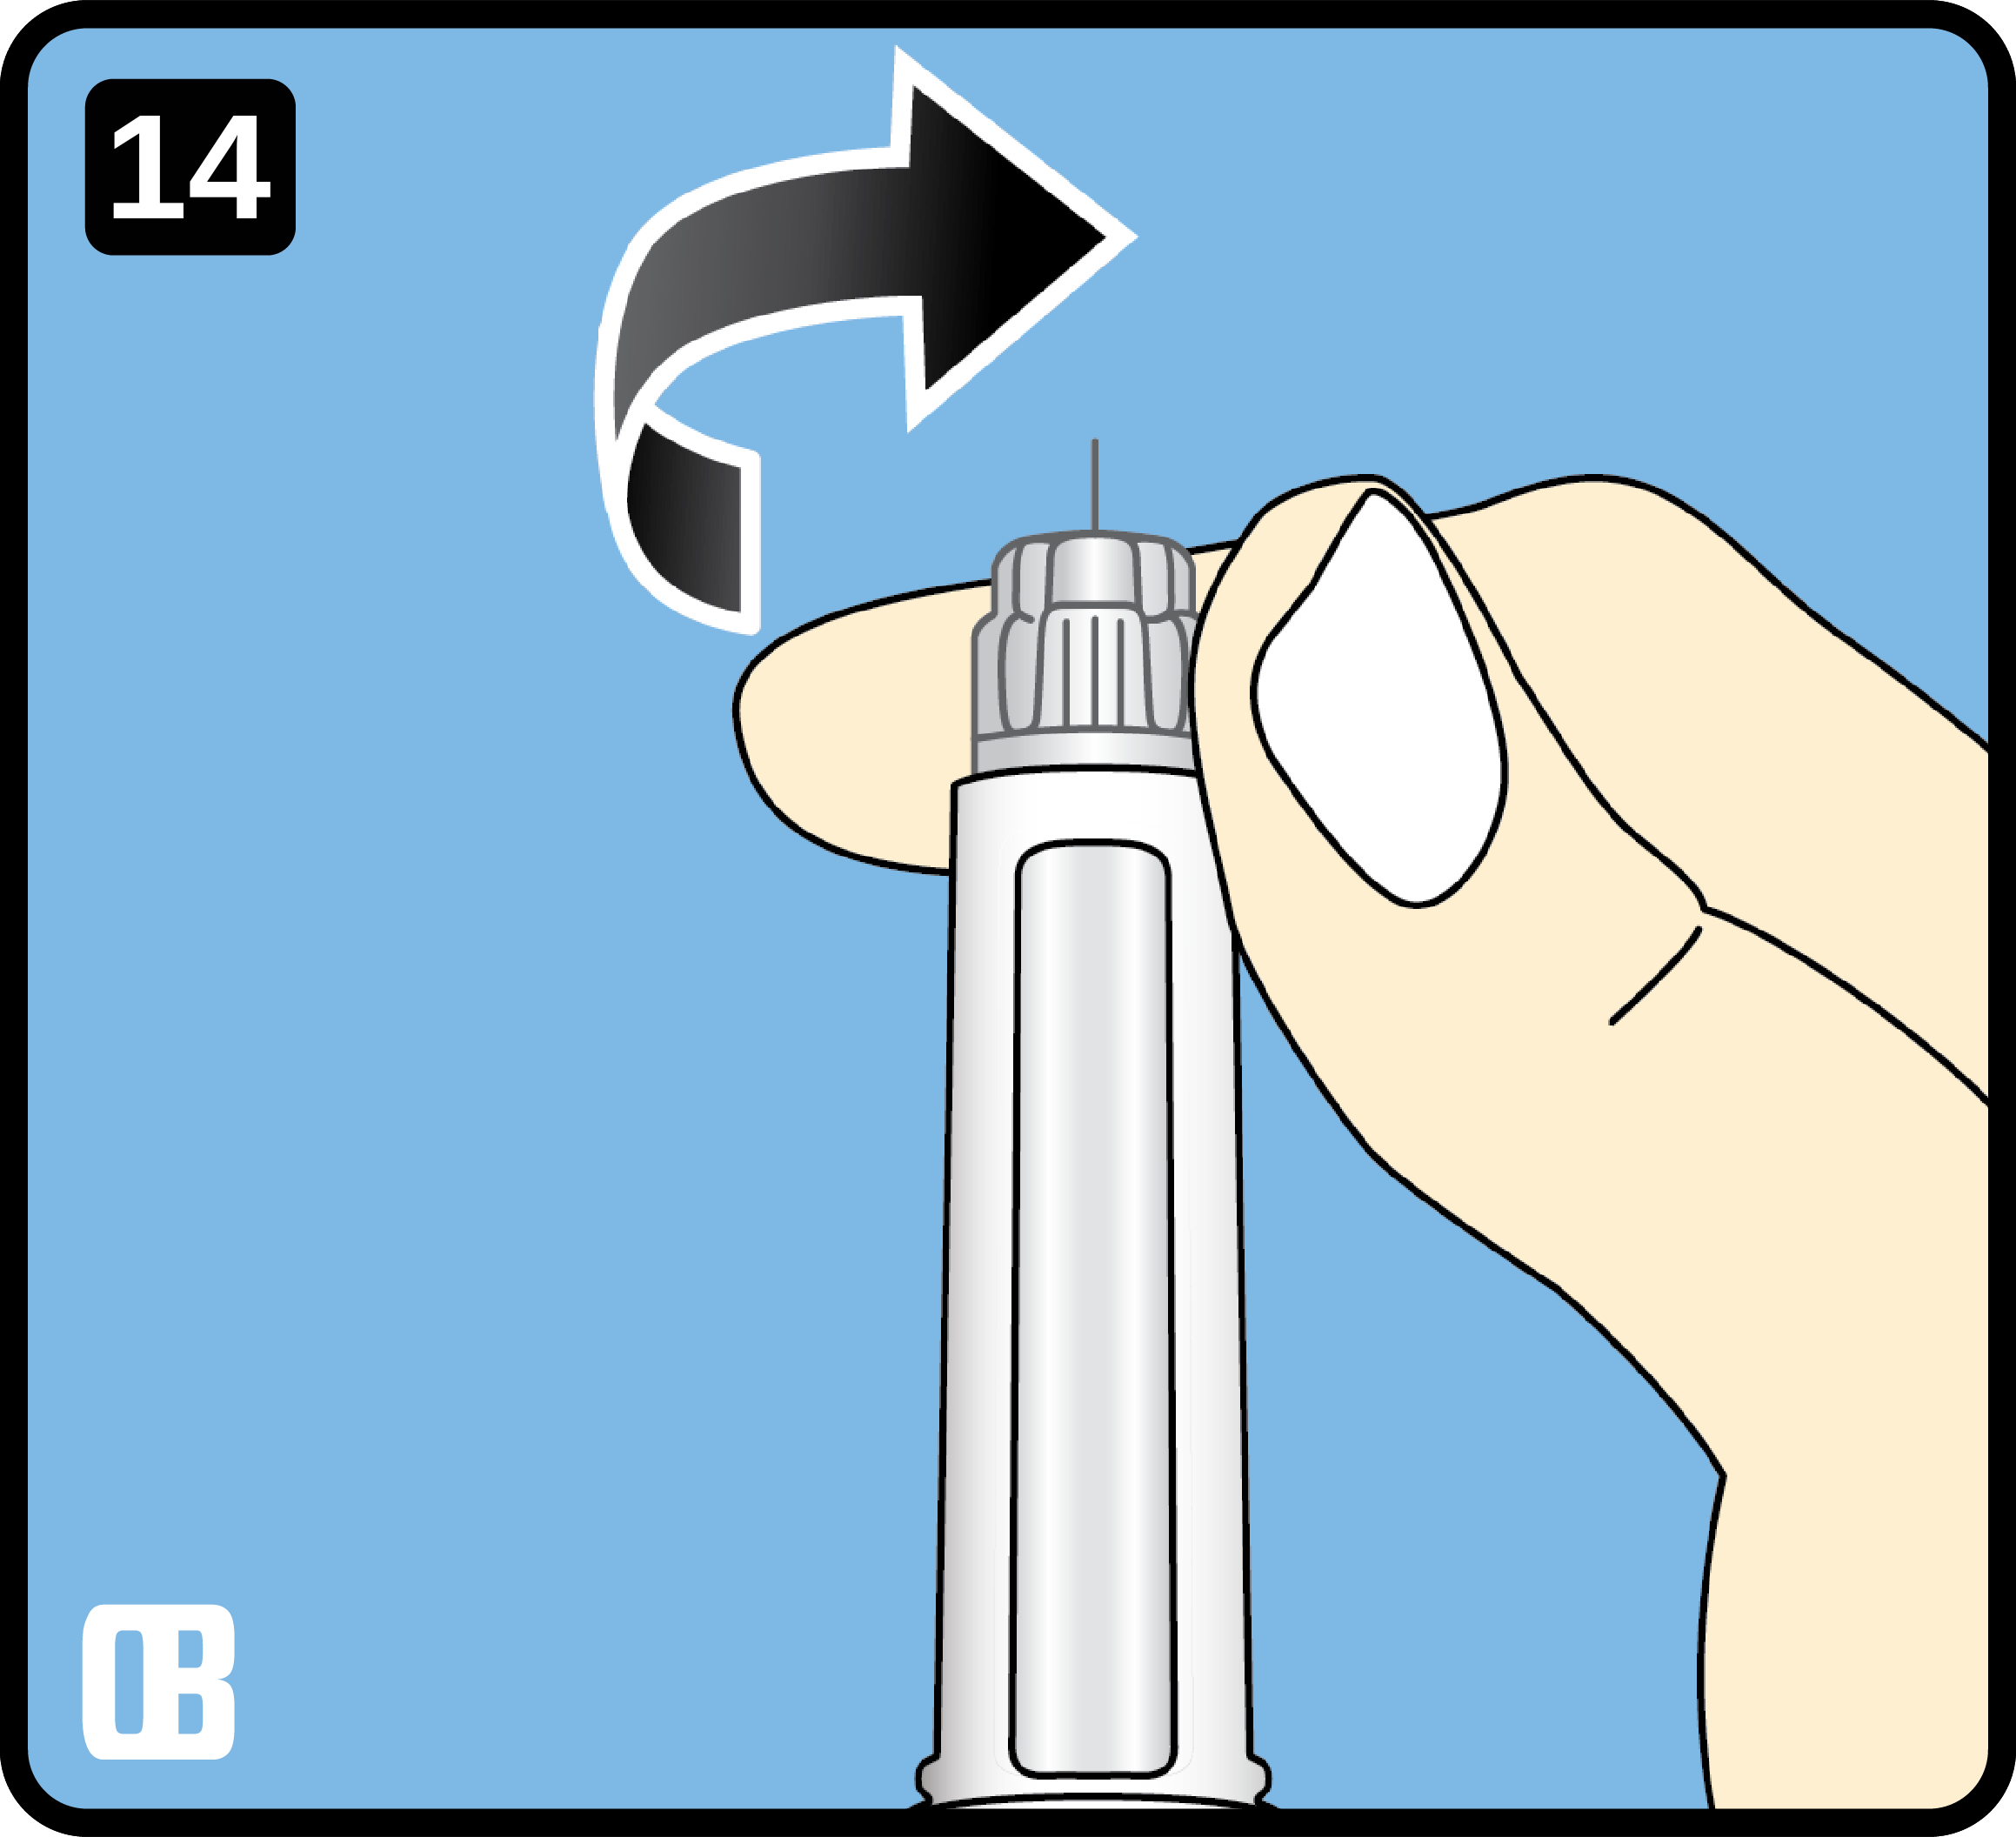
14

Re-Cap Carefully

Secure the needle cover again after use.

  • Replace the needle cover.
  • Ensure the cap is fully seated before storage.
  • Unscrew and dispose of the needle.

Important Note

Handle the needle cover with caution during cleanup.

Re-Cap Carefully
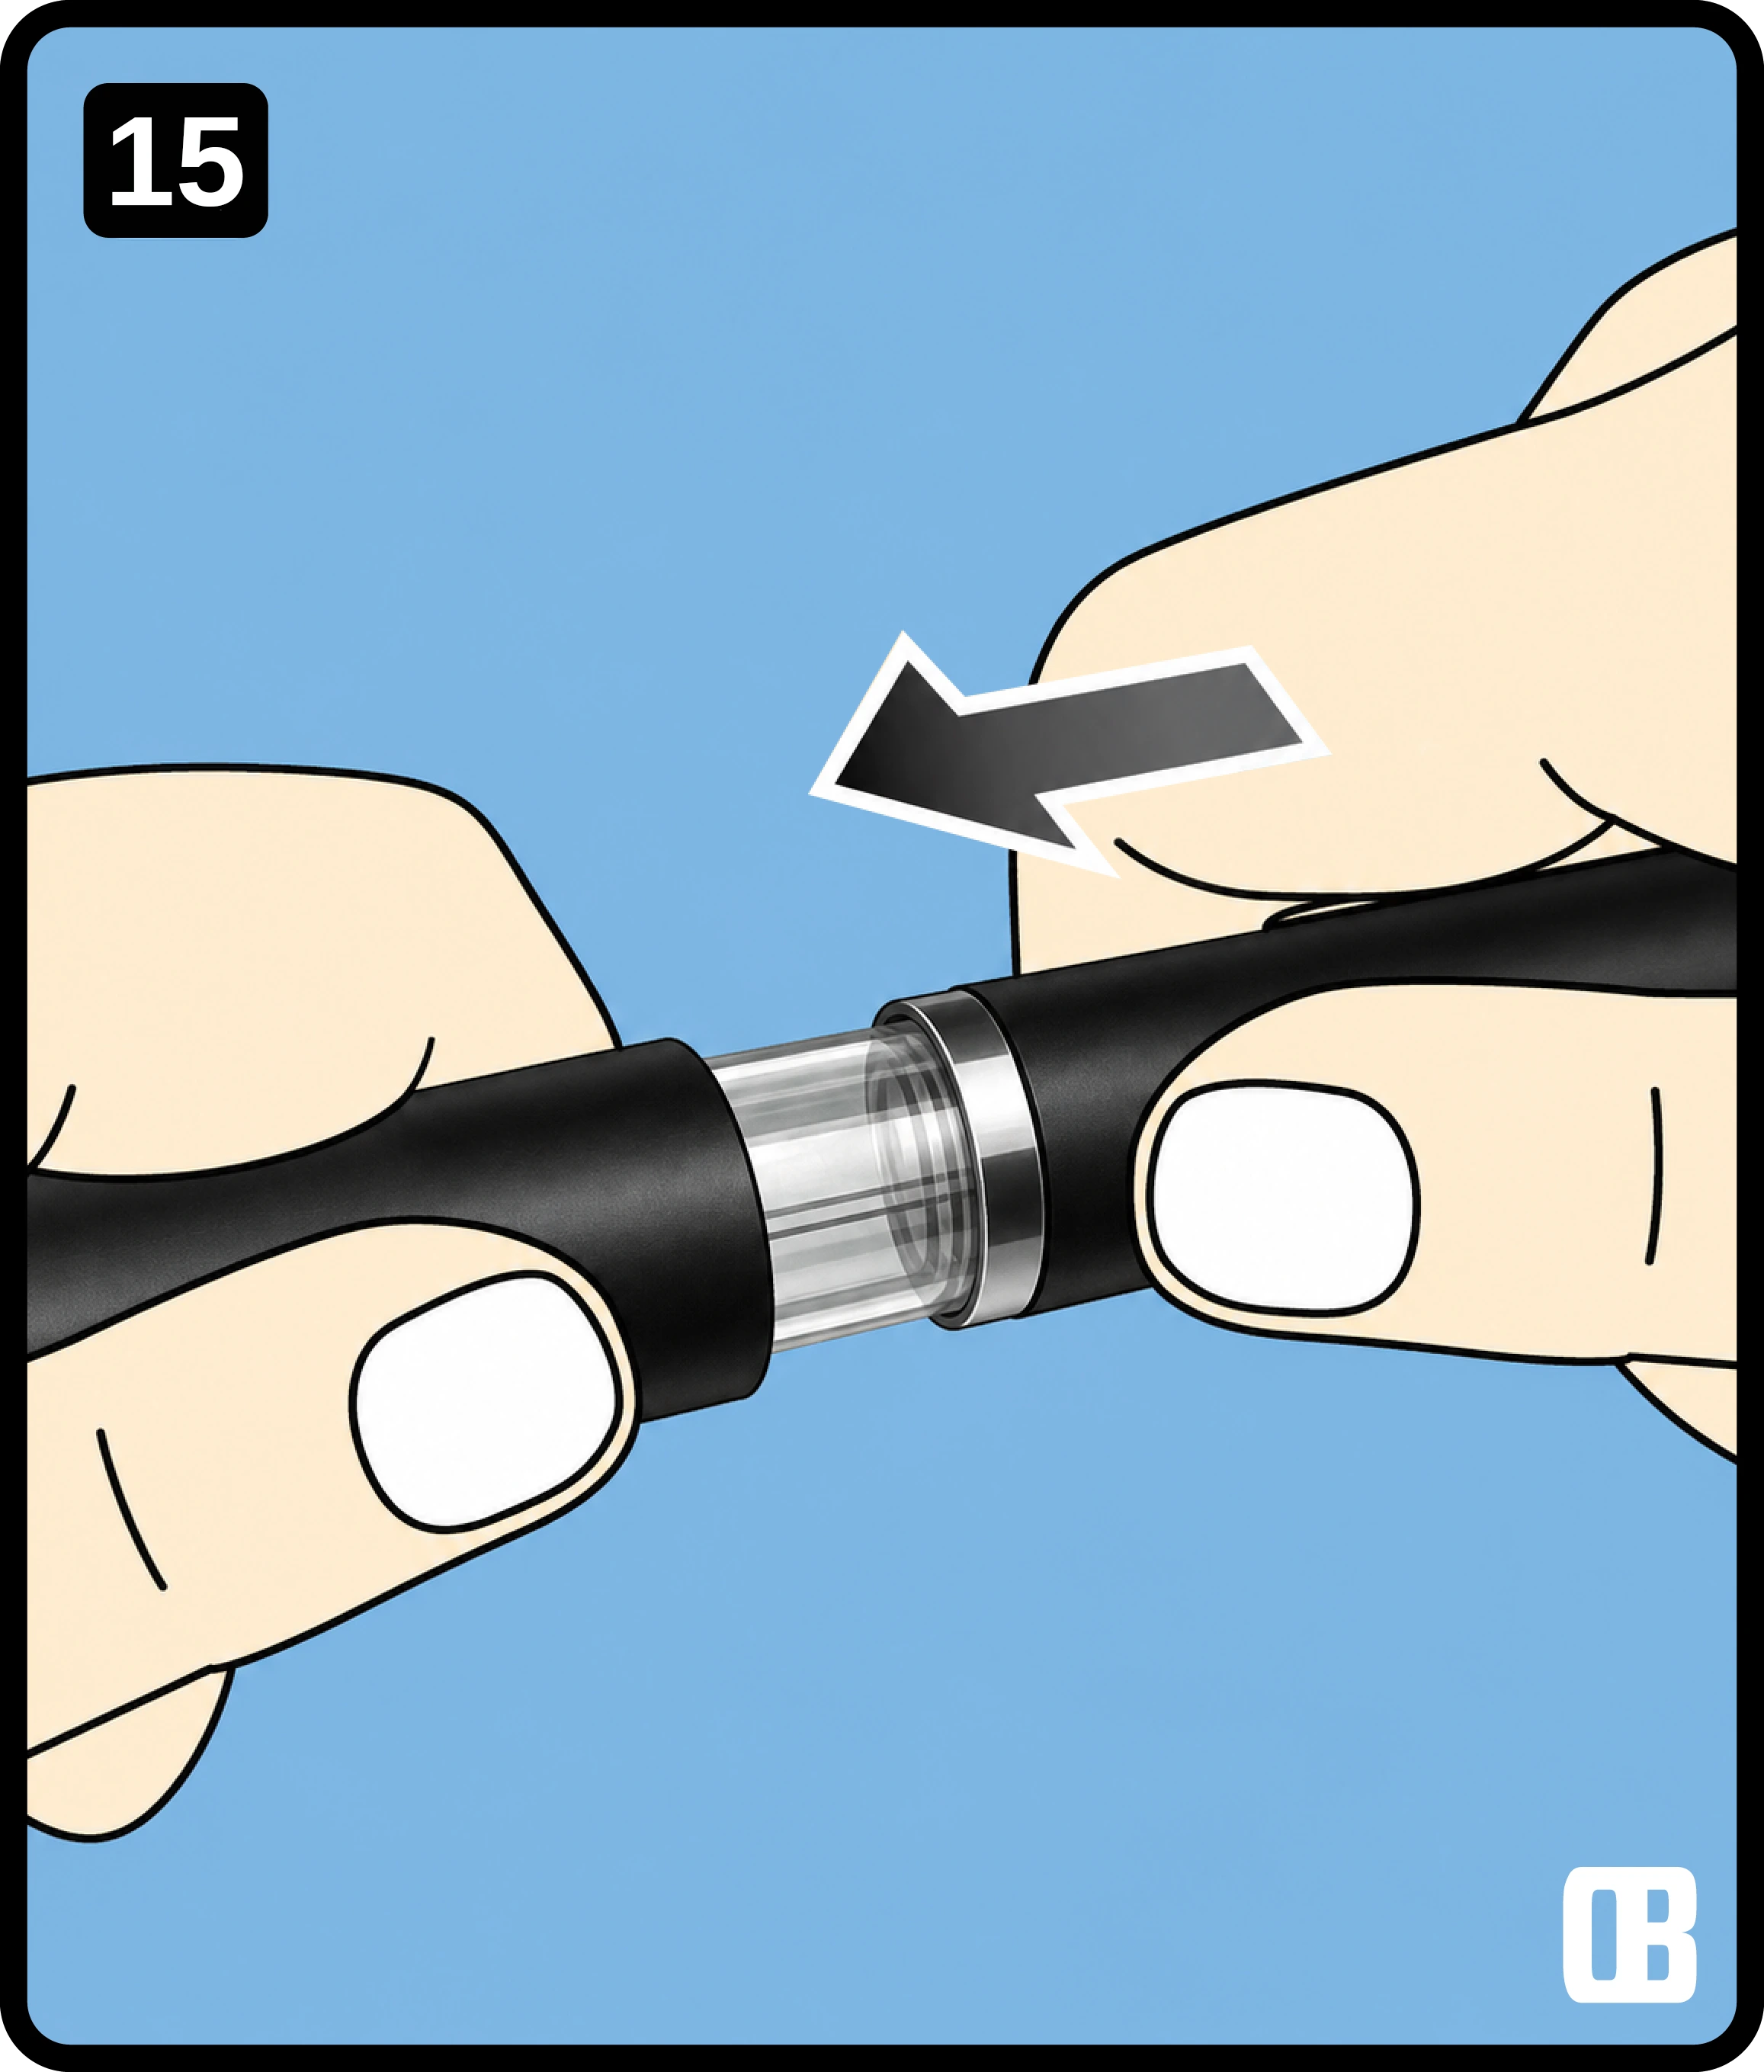
15

Reassemble and Store

Separate the pen components as needed and put away

  • Dispose of sharps or single-use components safely.
  • Store reusable parts in a clean, dry place.
  • Keep away from children.

Important Note

Follow local medical waste and sharps disposal requirements.

Reassemble and Store